Close
Of course, you can also reach us via e-mail or our contact form. We will get in touch with you as soon as possible.
Back to overview | Neuigkeiten in BabtecQ Go
In the following you will learn more about new features in the BabtecQ modules that are available for you in the new release 7.9. We hope you enjoy reading and wish you new ideas for the use of our software solutions in your company. New features await you in these modules:
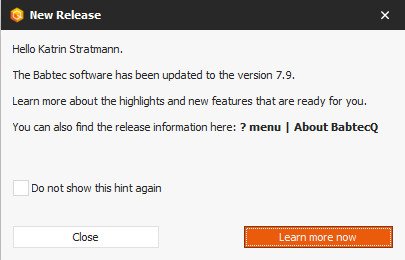
As soon as you log in for the first time after the software update, a message dialog about the new release opens. Click on "Learn more now" to go directly to the Babtec website, where you will find all the important information about the new 7.9 release. Simply select the module or topic that interests you and find out about the new features.
If you no longer want this message to appear the next time you log in, simply activate the option "Do not show this message again".
A hint: New users who are added or imported in the Babtec user administration after the software update to the current version do not receive an automatic reference to the release information when they log in.
The link to the Babtec website with the release information can also be found at any time in the ?-menu and there in the dialog "About BabtecQ".
In most modules, not only files or links (URLs) to external information that are important in the context of the respective Babtec data record (e.g. complaint or action) can be stored here - information or data records from other modules can also be linked here.
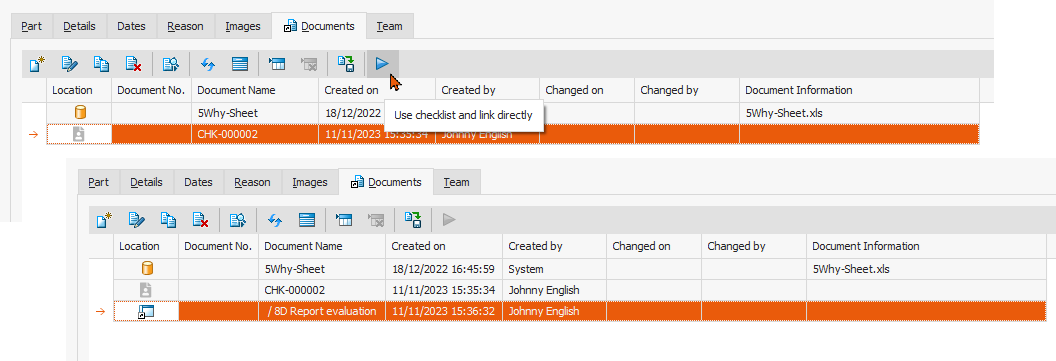
As of version 7.9, you can now also link fillable or already used and recorded checklists that are in the context of the Babtec data set.
An example: You would like to regularly check whether your 8D process is effective based on processed customer complaints. To do this, you use a digital Babtec checklist, which you can then link to the complaint process in question as a verification document in the "Complaints" module.
Alternatively, it was already possible to link a default document of the type "Checklist" to the Babtec data record in question on the "Documents" tab (storage location "My documents"). From version 7.9, you can now use this default document to create a fillable checklist using the new "Use checklist and link directly" function. This new fillable checklist is then linked directly in the currently open document tab and is of course also available in the "Checklists" module.
Above all, however, the checklist can be used immediately "without detours" to carry out the upcoming activities. Simply double-click or use the familiar "View file contents" function to open the newly created checklist, log in to BabtecQ Go in the browser and off you go – provided you have the appropriate user rights for checklists.
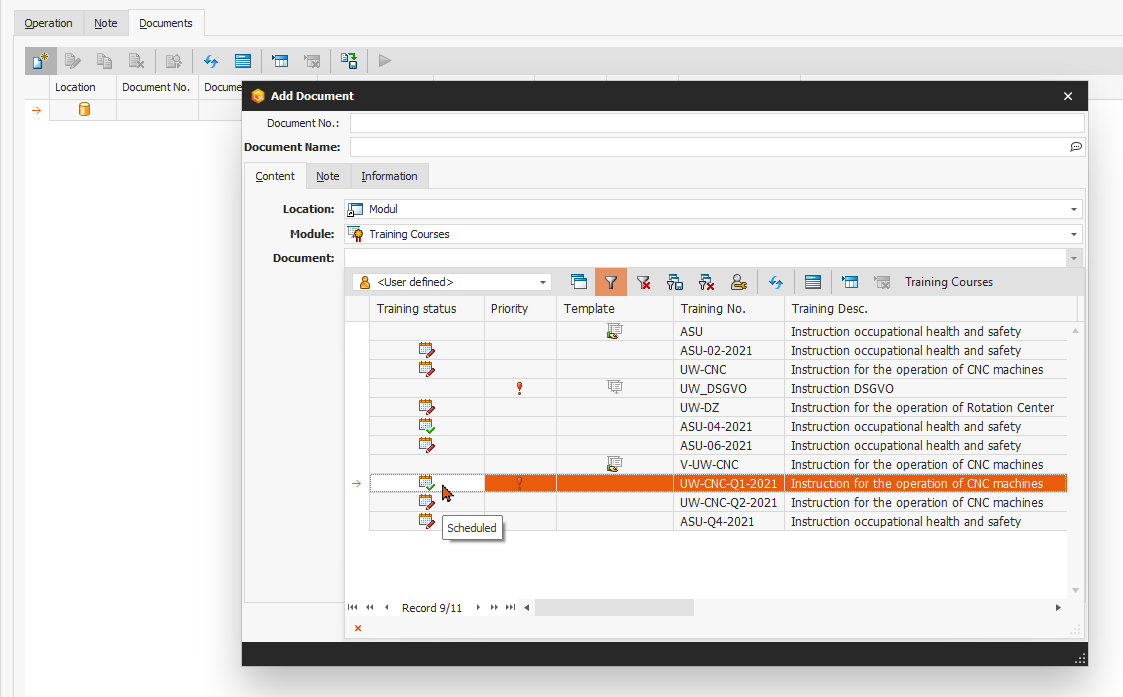
In most modules, not only files or links (URLs) to external information that are important in the context of the respective Babtec data record (e.g. complaint or action) can be stored here – information or data records from other modules can also be linked here.
As of version 7.9, you can now also store data records from the "Training courses" module as module links that are in the context of the opened Babtec data record.
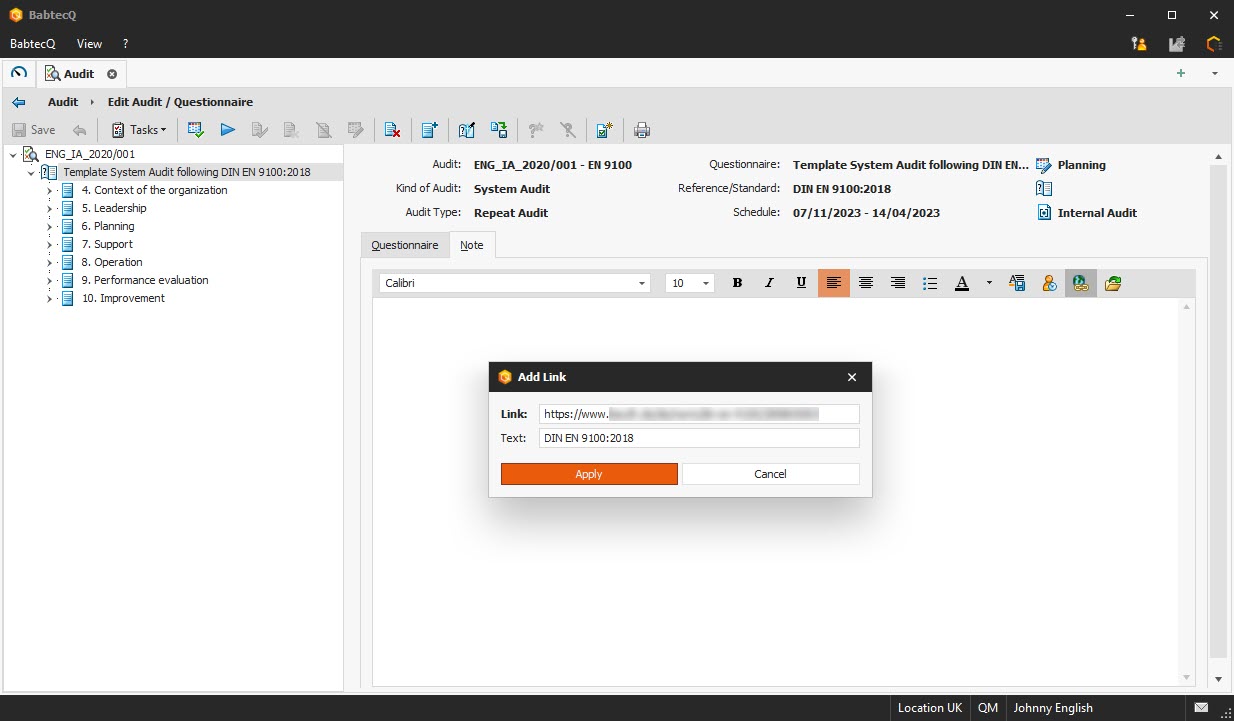
In all note fields, you can now use the new "Add link" function to easily create a new clickable link and, above all, assign a suitable name to the (usually long and cryptic) URL. This name is then displayed in the text of the note as a clickable link.
Have you ever been annoyed by the fact that you have already clicked on an entry in the tree structure immediately after opening a complaint or an FMEA/CP workbook, for example, but the screen is then updated and you have "clicked on the wrong entry"?
This was due to the fact that a different toolbar than in the list view had to be loaded to edit a data record and the navigation path was also displayed above the toolbar. As of version 7.9, this no longer happens: when the data record is loaded, the space for the navigation path and the toolbar is "reserved" directly, so that "jumping" of the tree structure and the editing area is now avoided.
The status bar at the bottom of the BabtecQ application displays information such as
Unlike before, this information is now always displayed in a fully legible manner.
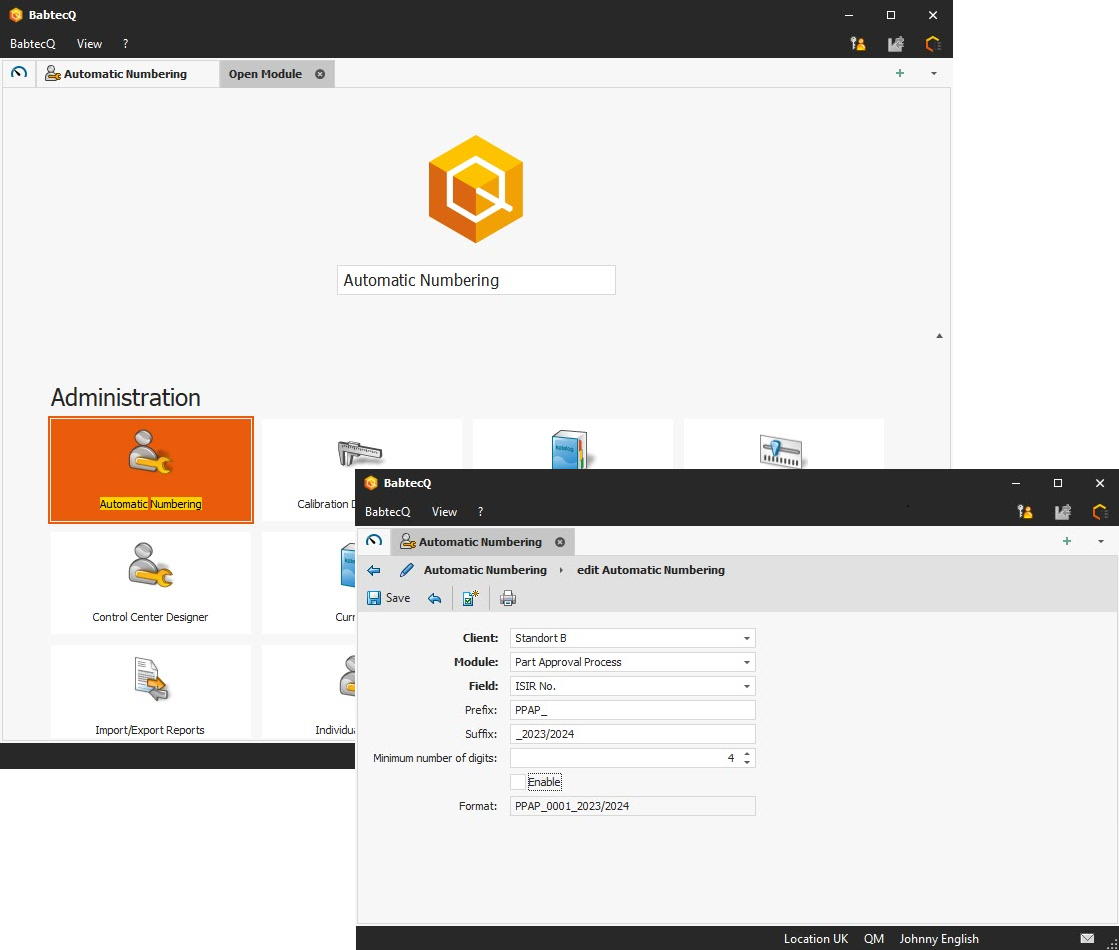
In the various Babtec modules, you record and manage important data and information relating to the quality of your products and processes. This data is stored in the database as data records that are identified by a unique number. This means that in many modules you can only save a new data record if this number has been entered beforehand.
If you would like the identification number to be generated automatically in these modules and suggested in the relevant field, you can activate this automatic number assignment in the new "Automatic numbering" catalog.
The definition of automatic numbering is currently available for the following modules:
If a number preassigned by the activated automatic numbering has been subsequently changed when editing a data record, the uniqueness of the number is ensured by an inspection when the data record is saved.
Please note:
If your BabtecQ system is multi-client capable, the configuration and activation of automatic numbering is client-specific.
The BabtecQ client software was converted from a 32-bit to a 64-bit application with version 7.9.
Please note the current system requirements: The BabtecQ Client can now only be run on 64-bit operating systems.
Notifications by e-mail, automatic data exchange between ERP systems and the Babtec software or the regular recalculation of Quality Cockpit key figures – these are just some of the important use cases for scheduled jobs that you appreciate as a Babtec user. This is because scheduled jobs generate useful information from data that supports you in the fulfillment of your activities.
However, a large number of such active jobs can put a considerable strain on system performance. This is particularly the case if several jobs search the database for relevant data at very short intervals. For this reason, the repeat pattern "Every second" is only available to a limited extent from version 7.9.
For you, this means that if it is really necessary to repeat a scheduled job within seconds, please get in touch with your contact at Babtec, who will advise you and work with you to find a solution.
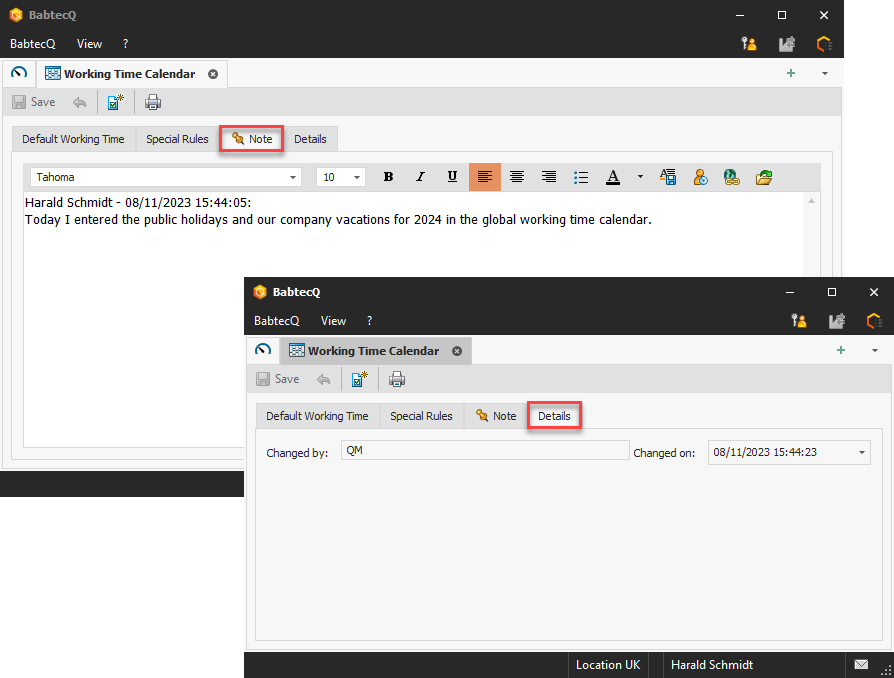
If you make changes to the globally defined working time calendar, you can use the new note field to record what was changed and, if necessary, why the change was necessary. This information can be helpful for other users - for example, if a decision has to be made in the APQP module for one or more projects as to whether the global working time calendar should be transferred to the project-specific ones or not.
In addition, the "Details" tab now shows who last edited the global working time calendar and when this change was made.
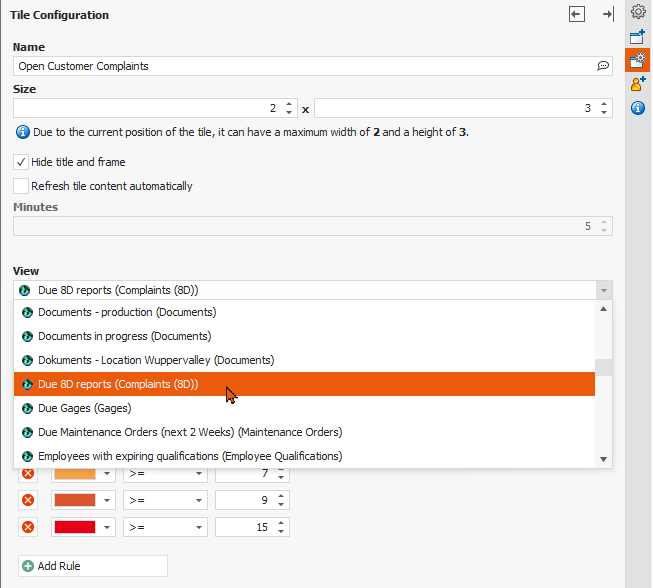
The views saved in the "Complaints" module in the "Complaints (8D)" list view could already be used as a "View" roof board tile or part of the "View list" tile. These saved views are now easier to recognize when configuring a tile, as they are now marked accordingly.
As of version 7.9.1, the saved views from the "Checklists" module can now also be used in the "List view" tile and used in your dashboards in both BabtecQ and BabtecQ Go.
In order to be well informed about the use of checklists in the future and to monitor the use of defined checklists in practice, you can use the following key figures from version 7.9:
From version 7.9, key figures are now also available for the "Employee qualifications" module, which you can provide in dashboards to keep track of the current status of existing qualifications:

If you have defined public holidays and company vacations in the global working time calendar ("Working time calendar" catalog in the "Administration" area), for example, you can easily transfer these special rules to the specific working time calendars of selected projects and templates.
The transfer is possible for all templates and also for projects that have not yet been completed or aborted.
During the update, all calendar days "from tomorrow" in the project-specific calendars are completely overwritten with the current global working time calendar. In addition to the project steps, the corresponding tasks are also updated. Please note that user rights are required to use this function.
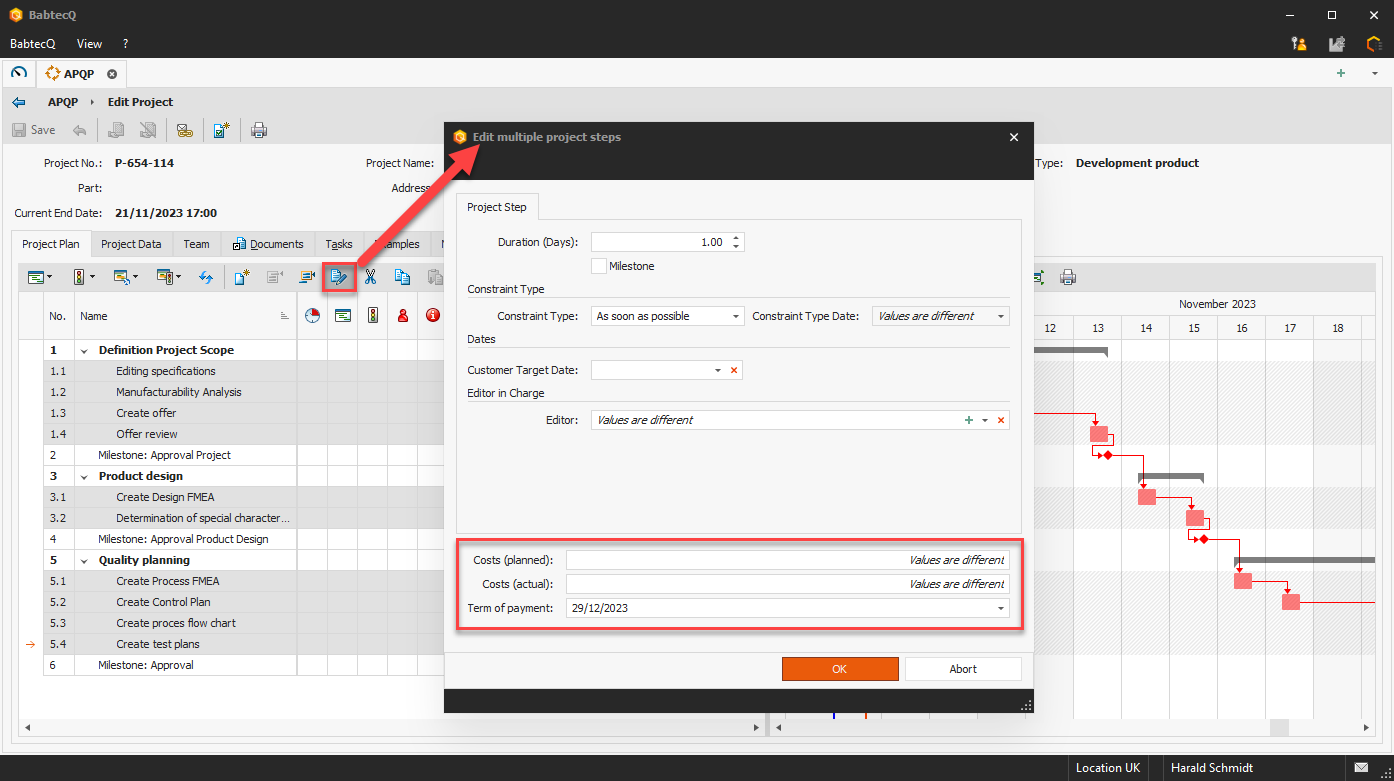
With the "Edit project step" function, certain content can be edited or changed for several selected project steps at once. A new feature is that content in existing user-defined fields can now also be edited in this way.
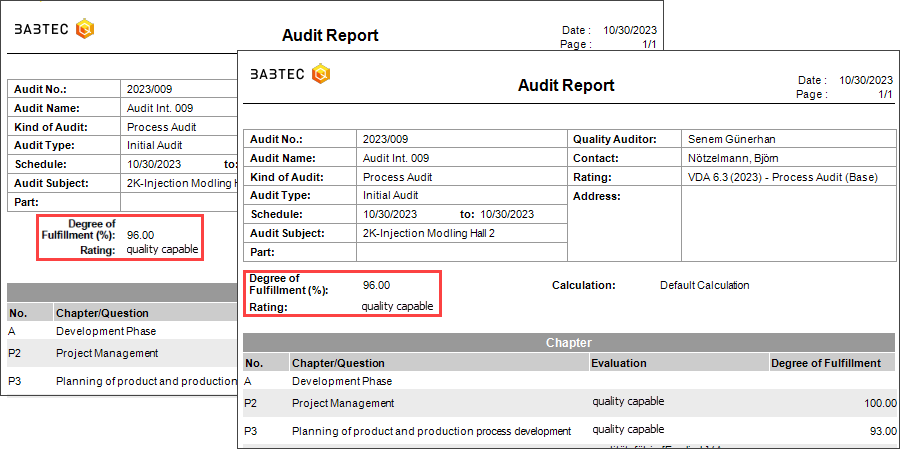
In the "Audit report" and "Audit report (detailed)" reports, the alignment of the field designations "Degree of fulfillment" and "Evaluation" has been changed from right-aligned to left-aligned for reasons of uniformity.
This report is now multilingual and is therefore provided in a multilingual configured system in the language of the logged-in user.
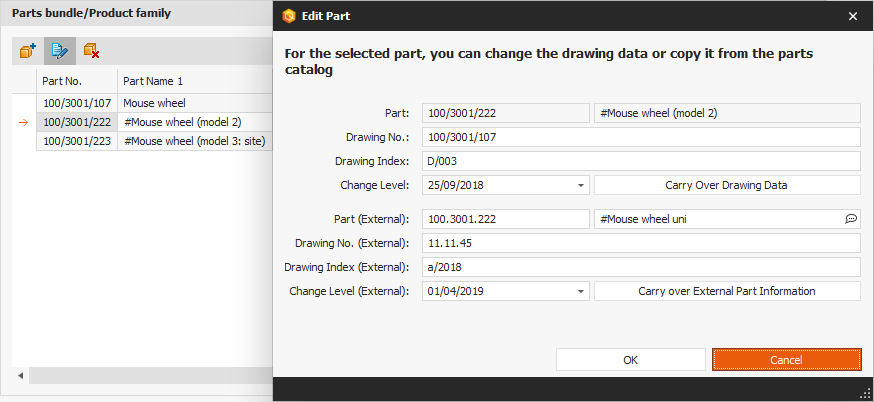
Chapter 7 – Special processes of the VDA guideline states under point 7.2: "Several variants of a product may be released in a joint PPF process. The details are to be agreed in the coordination of the PPF process."
It is therefore possible to specify additional products in the product family to which this part approval process relates in a part approval process in BabtecQ. The parts in question are selected from the part catalog in the "Part bundling/product family" area – the drawing data and external part information for which this (version of the) part approval process is valid can be taken from the part catalog or maintained individually.
In version 7.9, the VDA-specific translations for the "Part approval processes" module have been revised and updated.
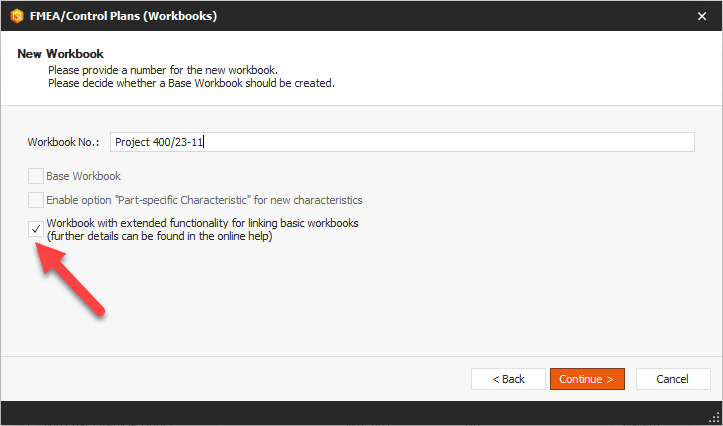
Do your products and/or processes or your organizational structure or areas of responsibility require the use of basic workbooks to support the creation and maintenance of comprehensive design and/or process FMEAs and control plans as effectively as possible?
If so, version 7.9 offers you a new alternative with an extended range of functions for using or linking your created basic workbooks in your product-specific workbooks, both now and in the future. We would like to take this opportunity to introduce you to this new use of basic workbooks. You can also find more detailed information in the current online help.
Please note that the new use of basic workbooks will be further developed for you in the coming versions and that you will therefore currently still have to deal with some "limitations" with regard to the planned scope of services. However, we would be delighted if you recognize the potential for yourself and start using it today. As always, we look forward to your feedback. Thank you very much in advance.
The decision is now up to you: When creating a new workbook, you specify whether this workbook already supports the new range of functions with regard to linked basic workbooks or whether you want to continue working with the previous range of functions from version 7.8 for the time being. You make the decision by activating or not activating the option "Workbook with extended functionality for linking basic workbooks".
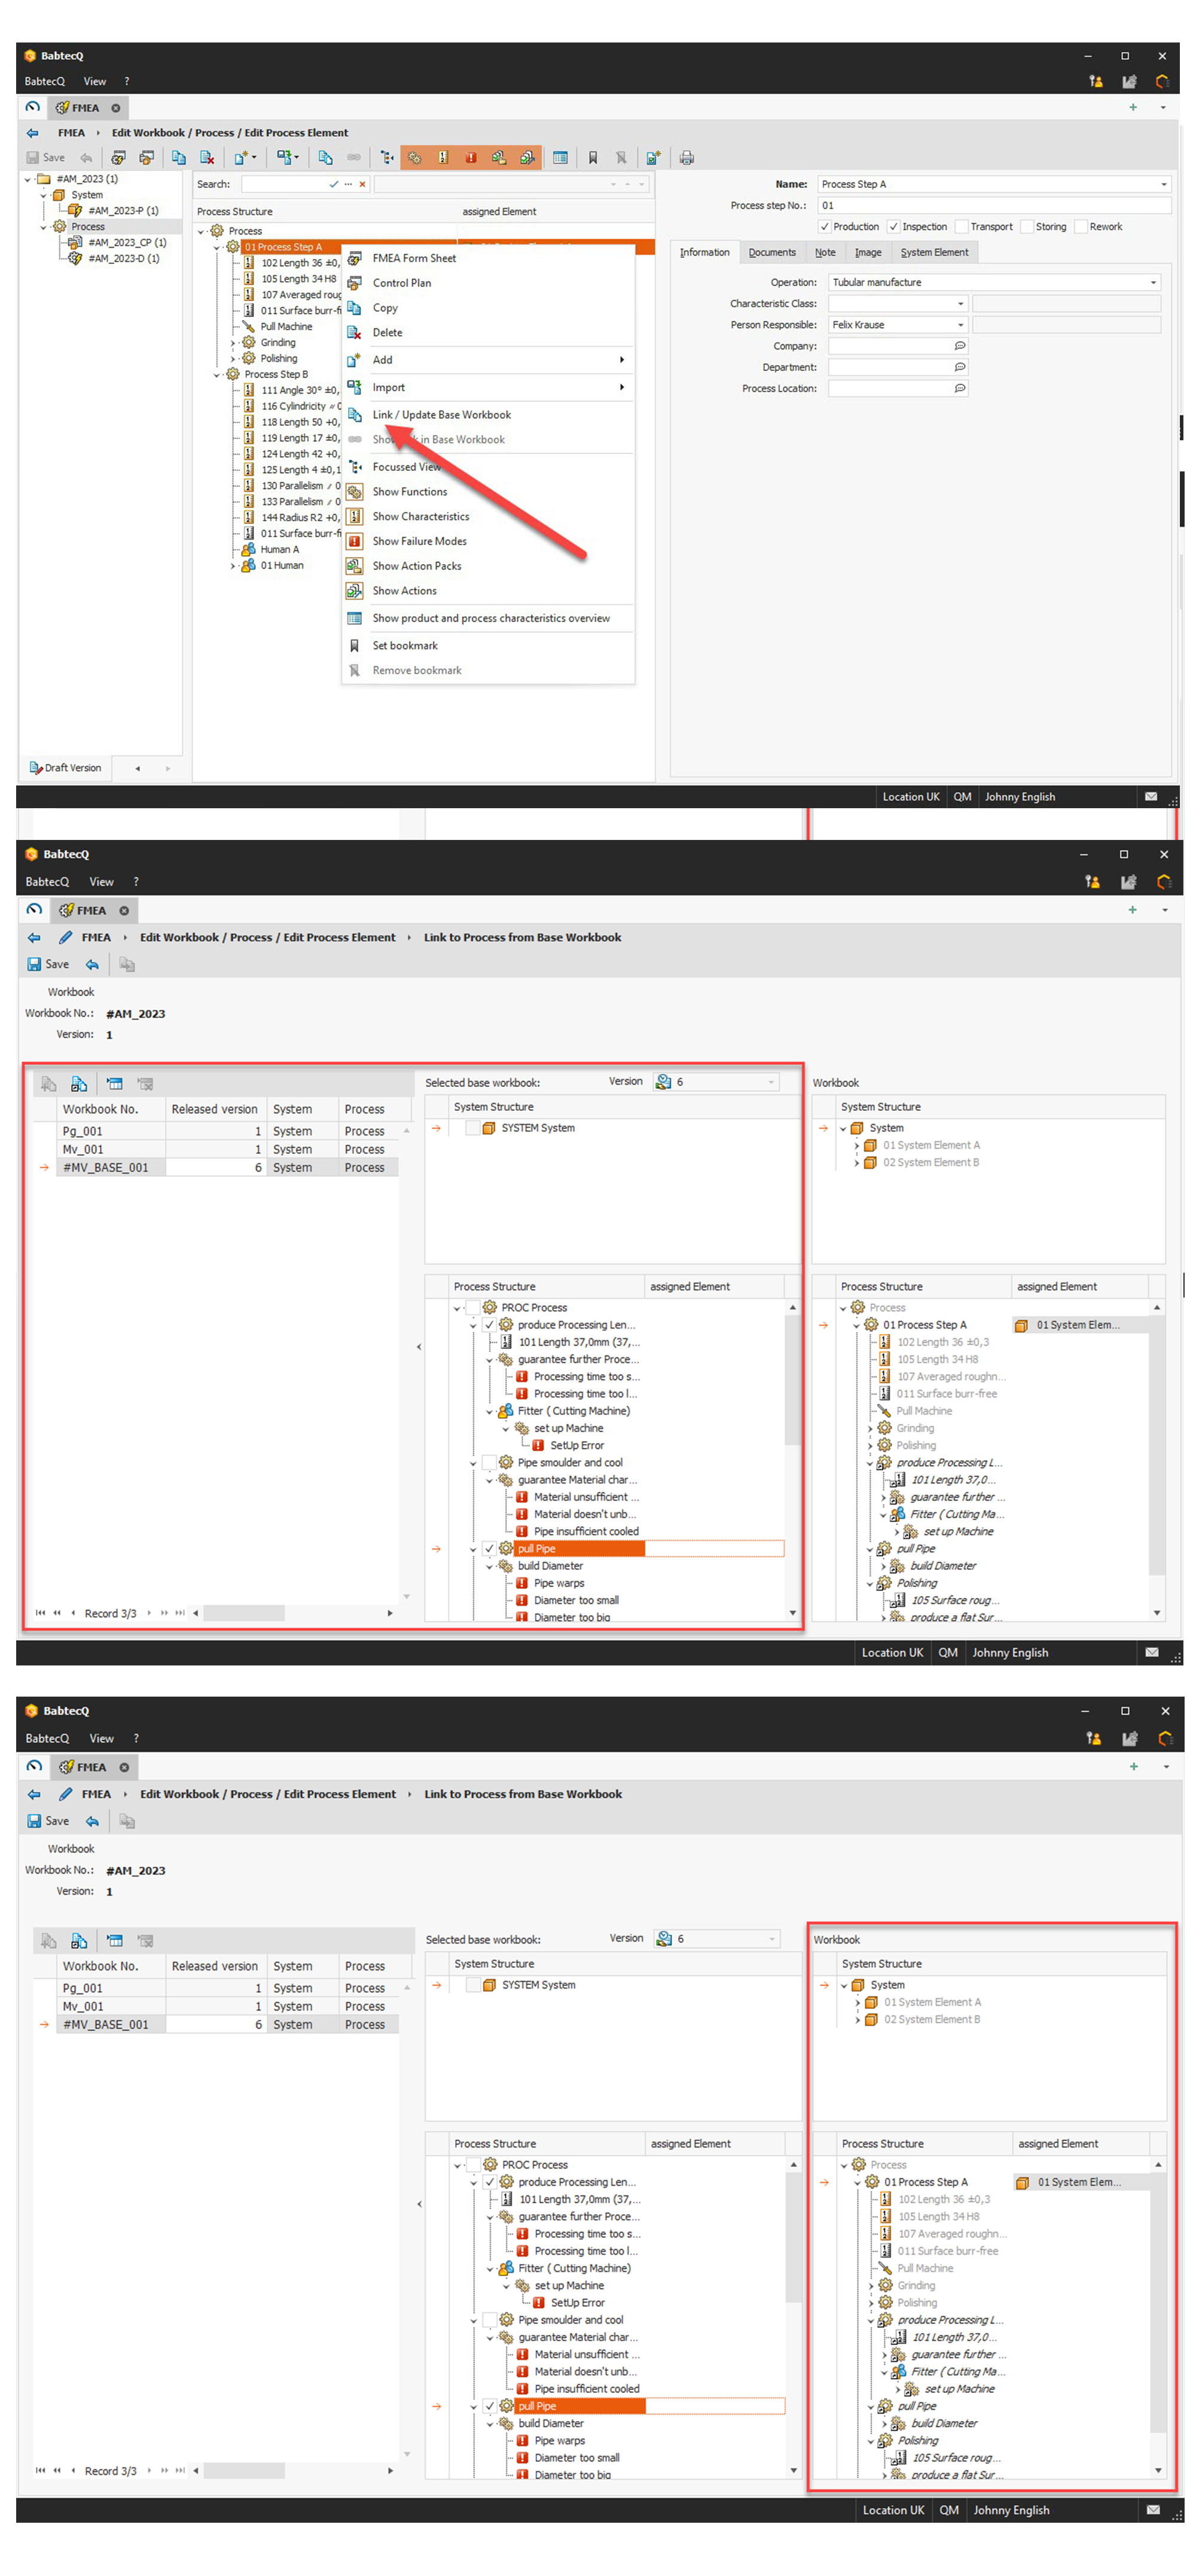
If you activated the option "Workbook with extended functionality for linking basic workbooks" when creating the workbook, you will find the new function call "Link / update basic workbook" in the system and process structure for a system or process element (see picture 1).
A new wizard then guides you step by step through the linking process.
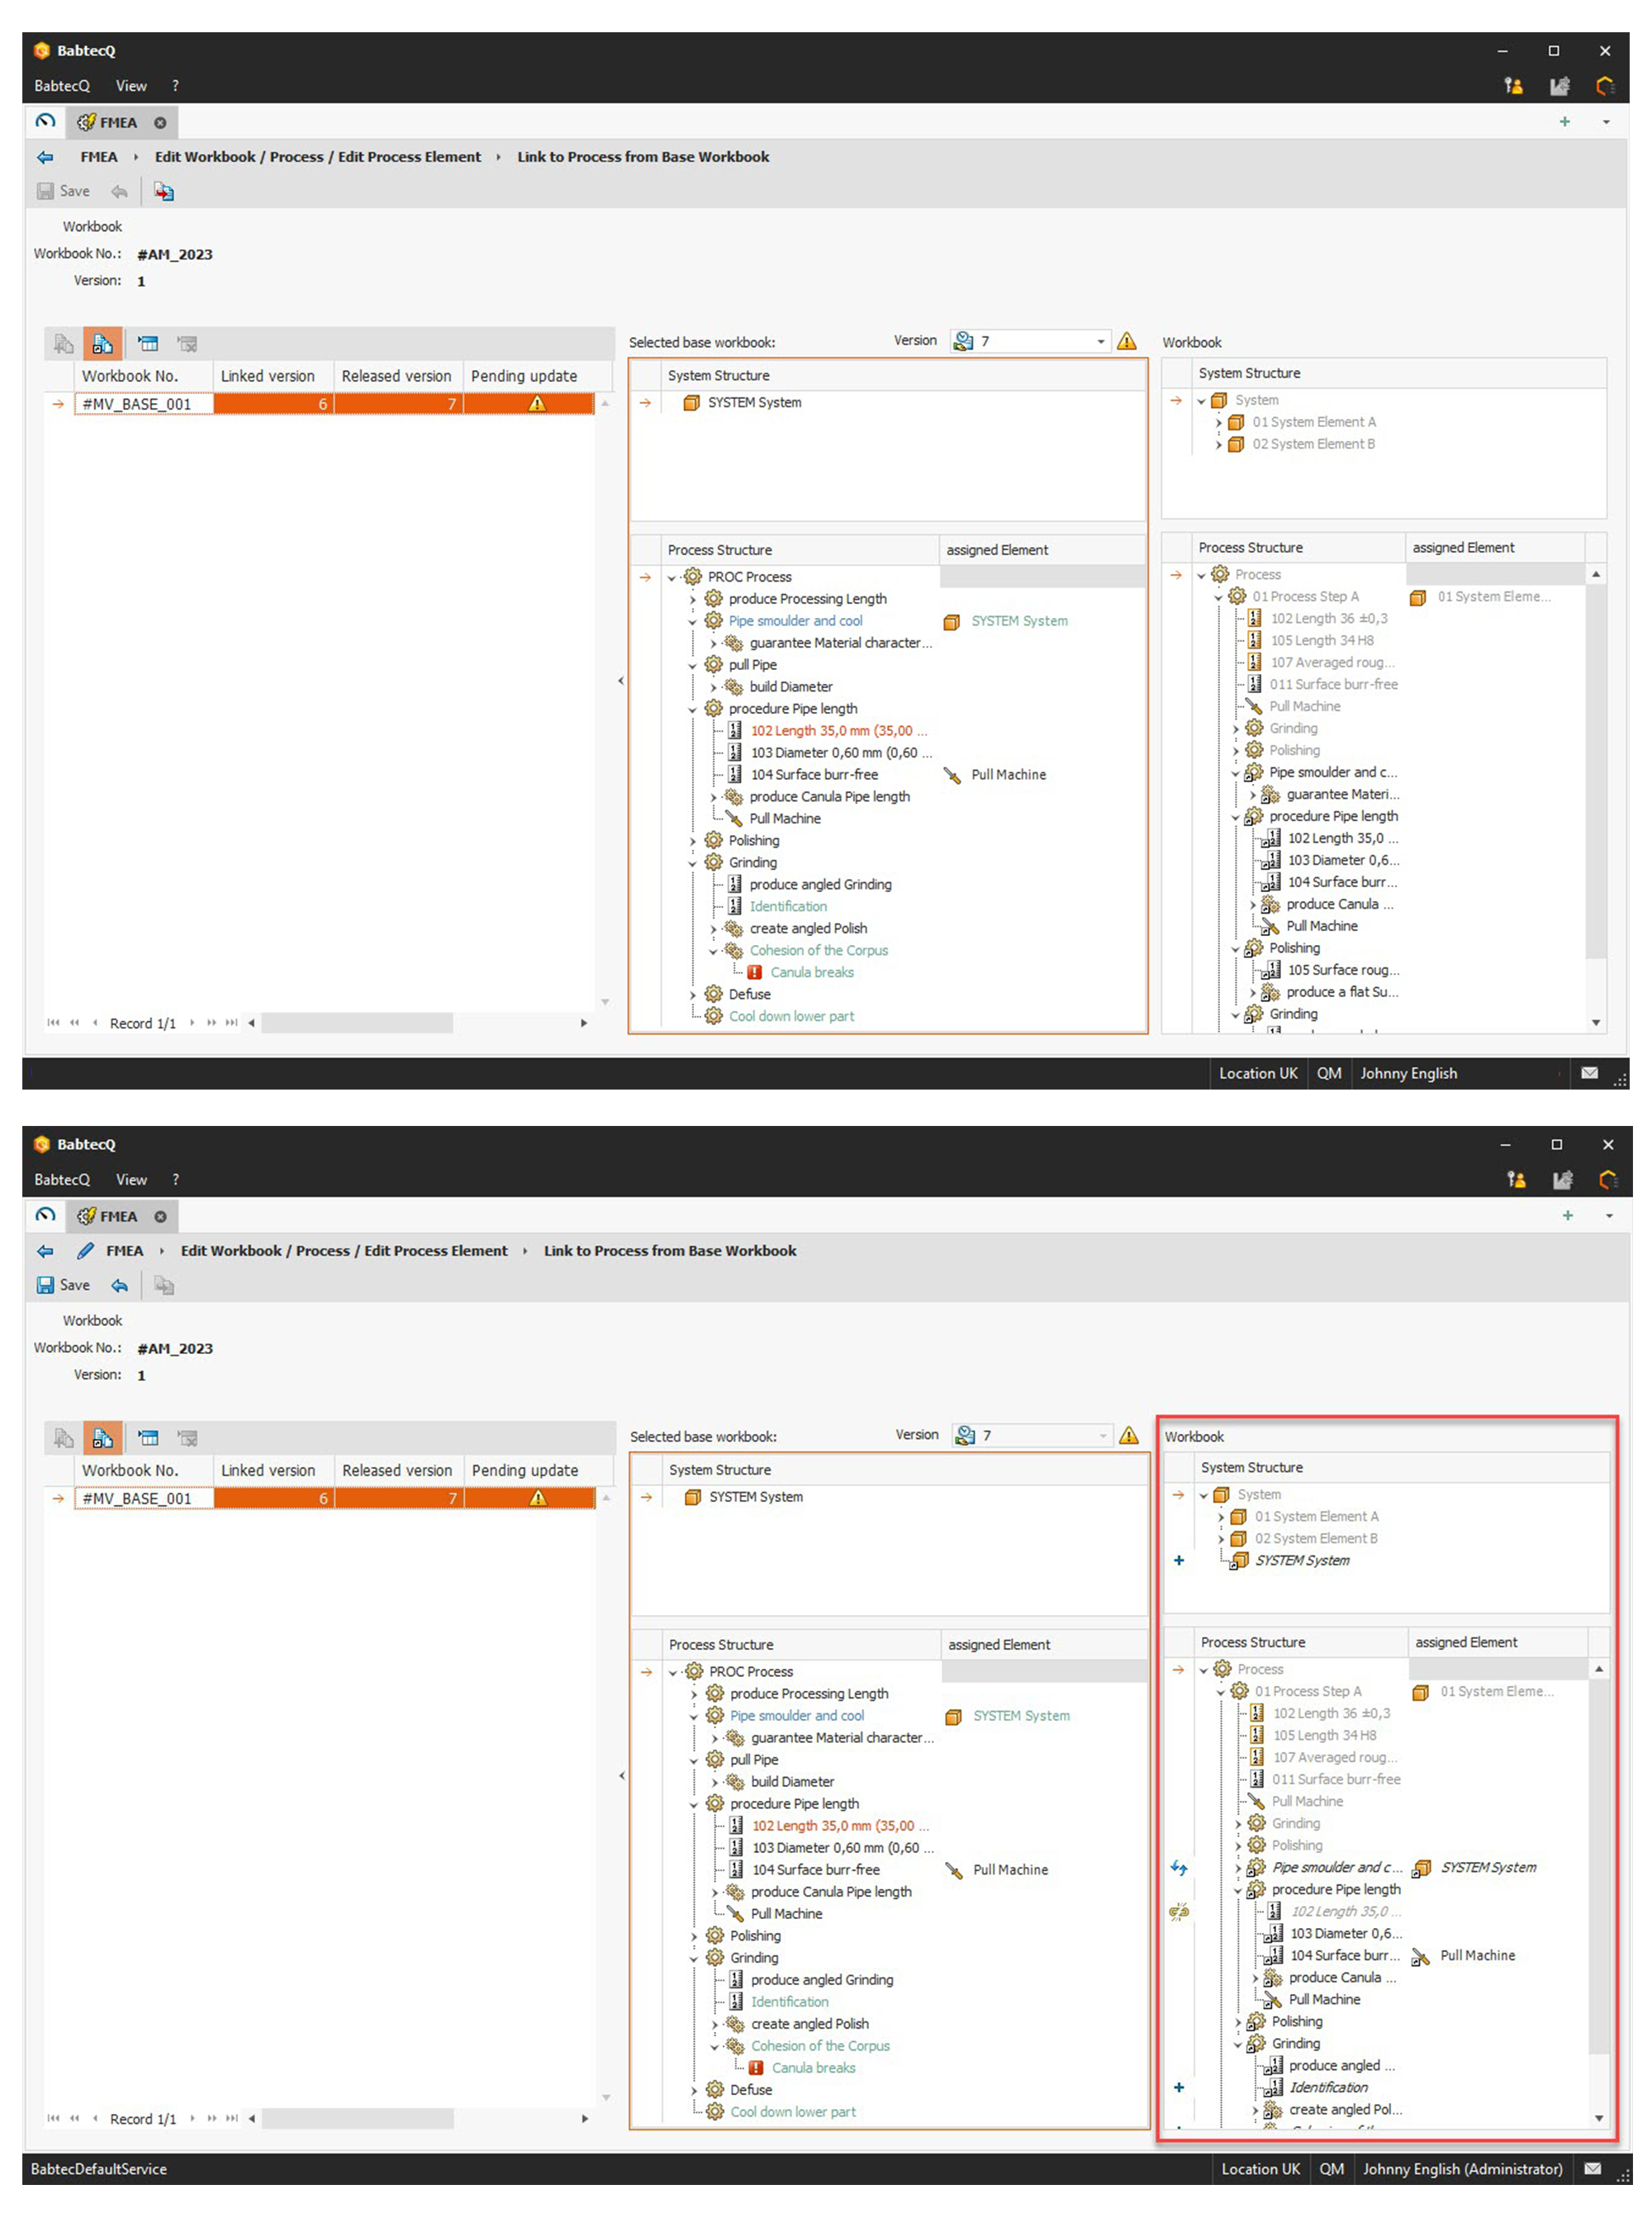
As before, the release of a base workbook means that the workbooks containing linked elements of this base workbook should be updated. If you had activated the option "Workbook with extended functionality for linking basic workbooks" when creating the workbook, you will be asked to check and update the relevant workbooks – an automatic update of these workbooks is not yet available. However, even in this case, our new wizard will support you step by step in update mode with new transparency. This is because the changes in the new version of the basic workbook are highlighted in color, giving you a quick overview of the changes.
Use the "Apply changes" function call to transfer all changes to your workbook. The effects are then immediately visible in the structure of your workbook and are easy for you to understand thanks to the marking with symbols. This makes it much easier for you to check and decide whether the changes should also be applied to your workbook. All changes – as they are now displayed in the structure of your workbook (e.g. deletion, addition of elements or changes to content) – are only actually transferred when you save.
The new use of basic workbooks will offer you many advantages, including
If you would like to find out more about the new rules for the new use of basic workbooks, please refer to the online help.
We hope that the advantages of the new use of basic workbooks will convince you. Please note the current "limitations" in version 7.9 compared to the previous behavior and with regard to the planned scope of services that we will provide you with the upcoming versions:
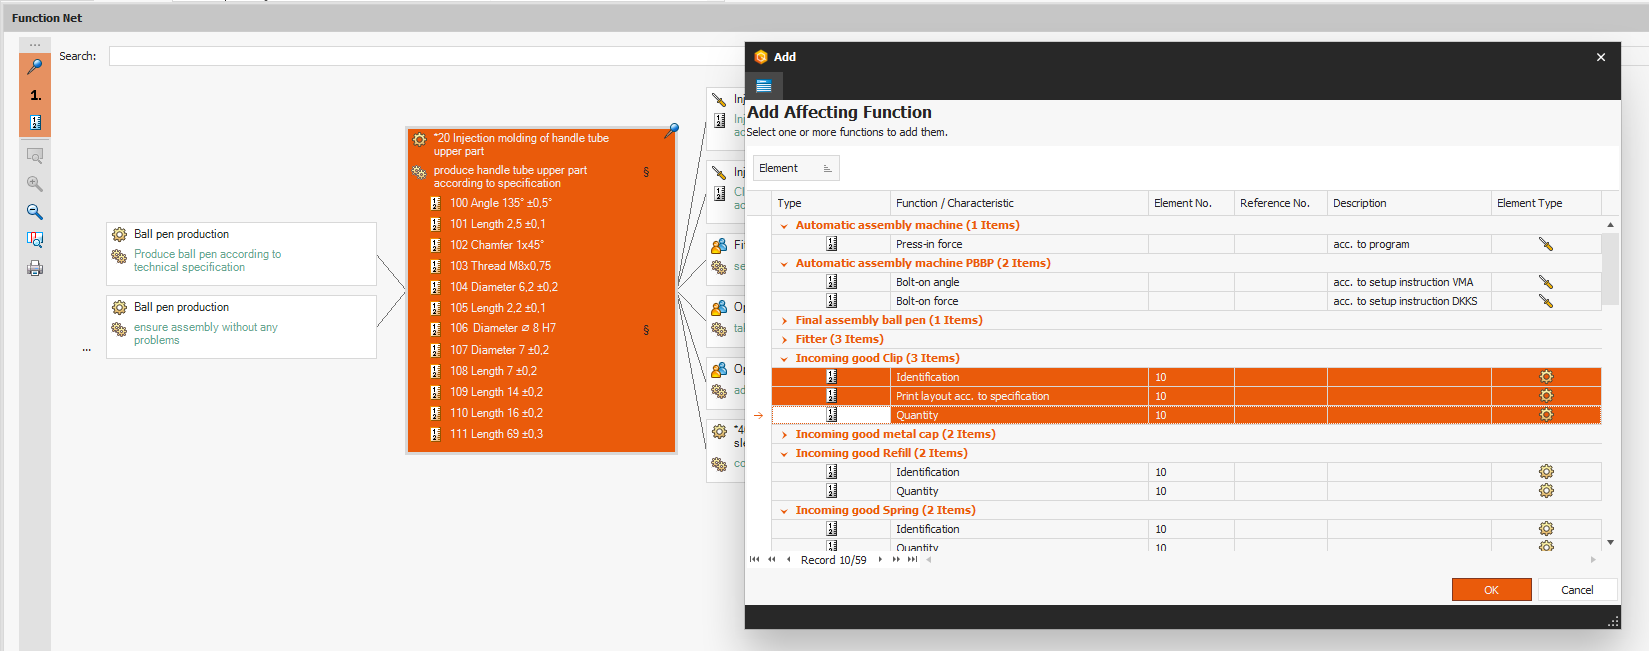
As part of the function analysis, it makes sense to link the identified functions and characteristics in a function net according to their effect. The "Add contributing function" and "Add influenced function" function calls are available in the context menu of a function (or characteristic) selected in the network, which you can use in particular if you need a quick overview of the functions and characteristics that can still be linked or if several elements are to be linked simultaneously.
As of version 7.9, you now also have the option of grouping the selection list of linkable elements (similar to the failure net). This gives you a quicker overview of the elements in the FMEA and you can use the column filters to easily find the elements you want to link.
In the "Actions" module, the list views can now also be filtered by actions that were originally created when using a digital checklist.
From version 7.9, key figures are now also available for the "Employee qualifications" module, which you can make available in dashboards:
In most modules, not only files or links (URLs) to external information that are important in the context of the respective Babtec data record (e.g. complaint or action) can be stored here – information or data records from other modules can also be linked here.
As of version 7.9, you can now also store data records from the "Training courses" module as module links that are in the context of the opened Babtec data record.
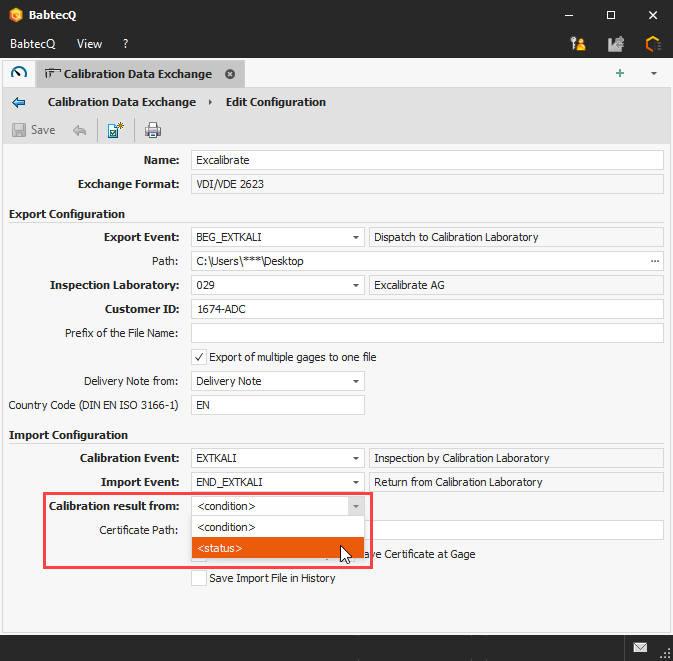
In the "Calibration data exchange" administration module, you can now define in the import settings of a calibration profile whether the calibration result should be imported from the <condition> tag (default) or from the <status> tag of the result section.
Background:
The calibration service provider Perschmann Calibration GmbH provides its customers with the results of the calibration by means of a file in accordance with VDI/VDE 2623. The result of the inspection is transmitted in two fields:
The assignment of <condition> to <status> is agreed between the contractual partners in consultation with Perschmann. With the extension described above, you can now set which information from the transmitted calibration data is to be used for the documentation of the calibration decision in the "Gages" module in accordance with your agreement.
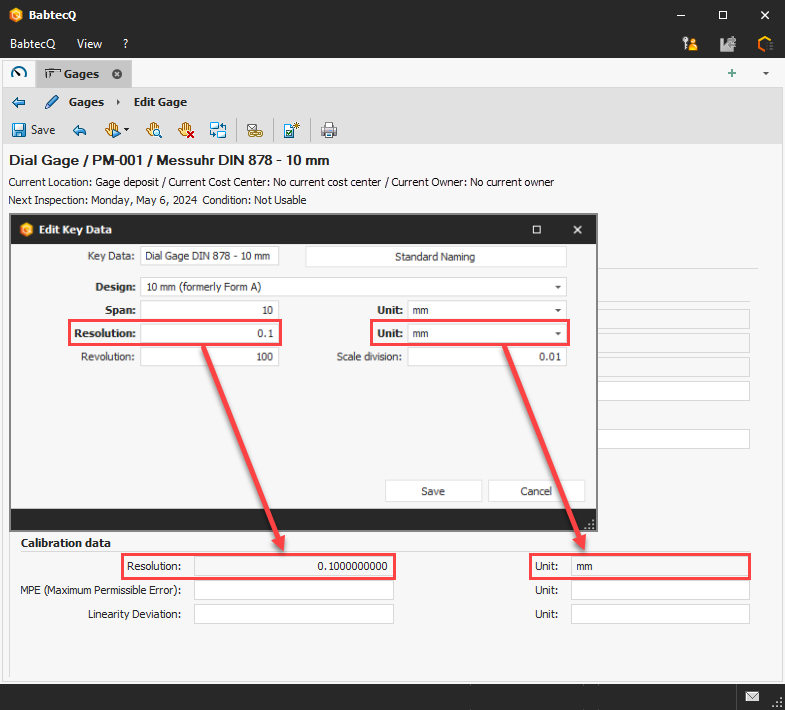
The "resolution" parameter is one of the key data of a gage. The resolution is therefore stored in the gage key data. In addition, the resolution is also specified in the master data of a gage in the "Calibration data" area.
As of version 7.9, the system now ensures that this parameter has the same value in both the gage key data and the calibration data, provided that the resolution was specified in the gage key data (depending on the gage type).
This means for you: If the resolution is stored in the gage key data, this value including the unit is always also displayed in the calibration data. If the resolution is changed in the gage key data, the resolution is also immediately updated in the calibration data. For this reason, the field in the "Calibration data" area is now write-protected in this case. As long as the gage key data does not contain a resolution, the field in the "Calibration data" area can be edited.
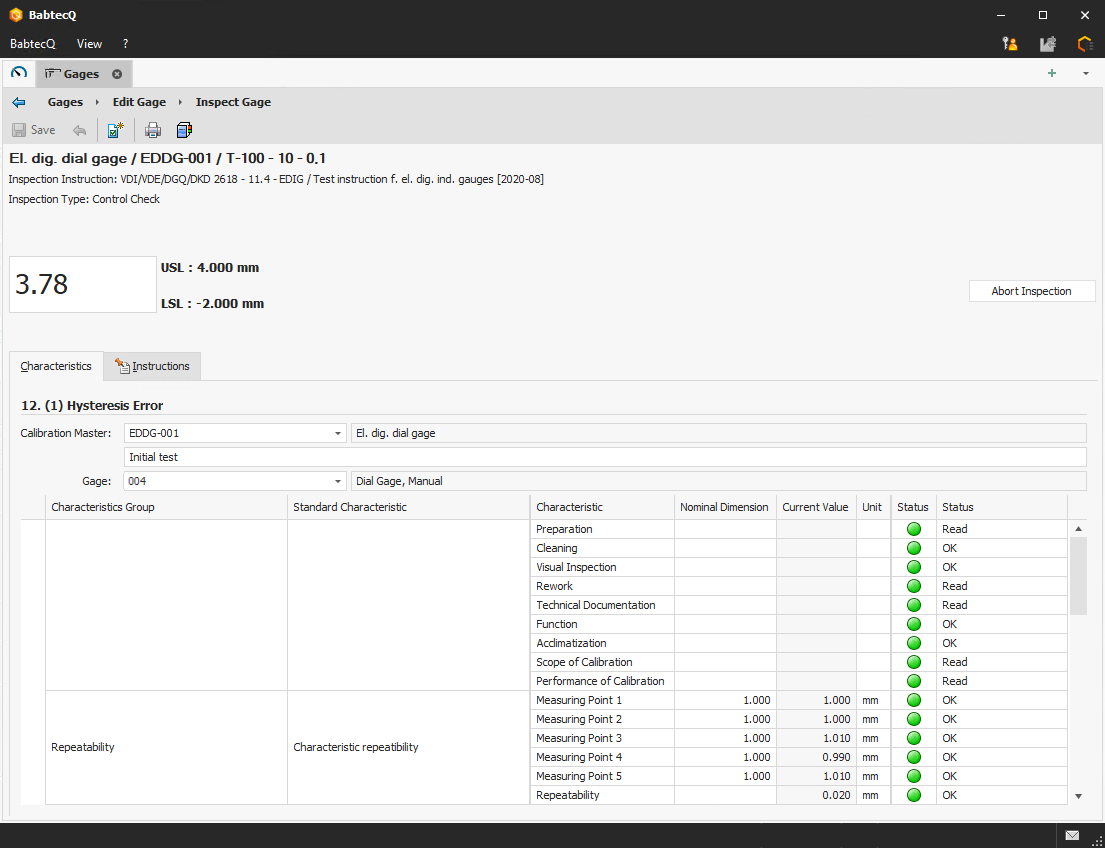
In version 7.9, a new inspection instruction for electronic digital dial gages based on the VDI guideline was provided in the "Inspection instructions" catalog. An associated gage standard enables the maintenance of the relevant error limits according to the manufacturer's specifications and internal factory specifications for the internal test of electronic digital dial gages.
In the "MSA" module, you can carry out and document the required tests to ensure and prove that your planned gages and inspection processes are suitable for the respective measurement task and capable of delivering valid results. Our aim is to provide you with the necessary processes as quickly as possible in accordance with the latest specifications and guidelines.
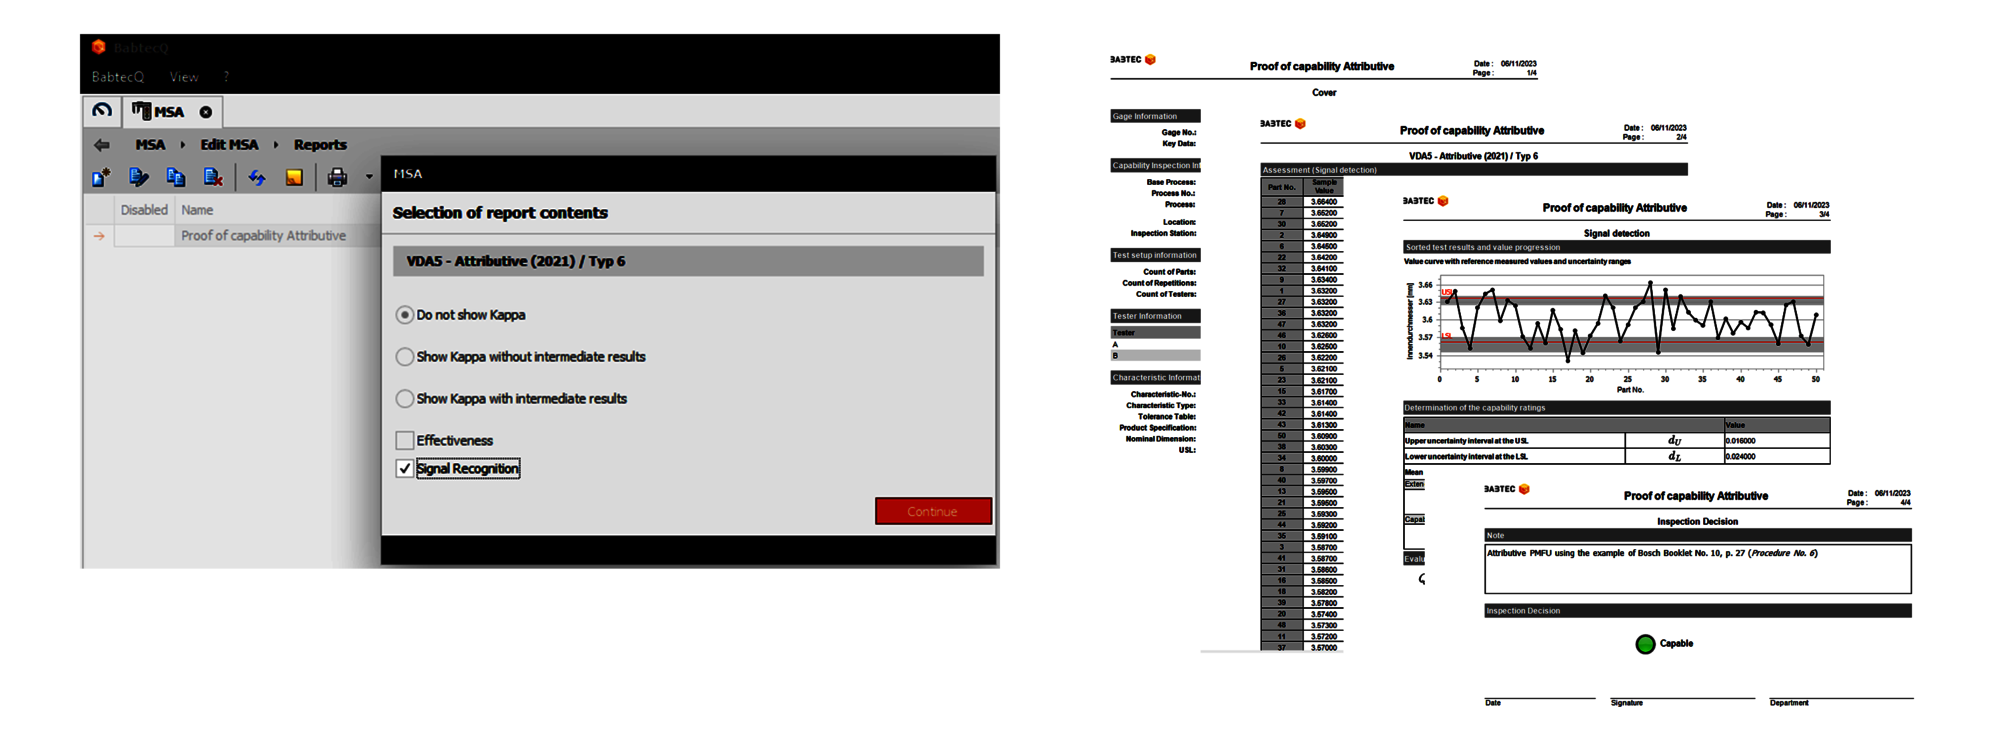
For this reason, a new attributive process according to VDA Volume 5, 3rd edition (2021) is now also available in this version.
Please note:
The basic procedures "Measurement uncertainty (Upm)", "Measurement uncertainty Upp)", "Measurement uncertainty (QMS)" and "Measurement uncertainty (QMP)" are no longer supported. Therefore, as of version 7.9, you can only create new MSA processes according to VDA 5 on the basis of the basic processes "Measurement uncertainty QMS (2021)" and "Measurement uncertainty QMP (2021)".
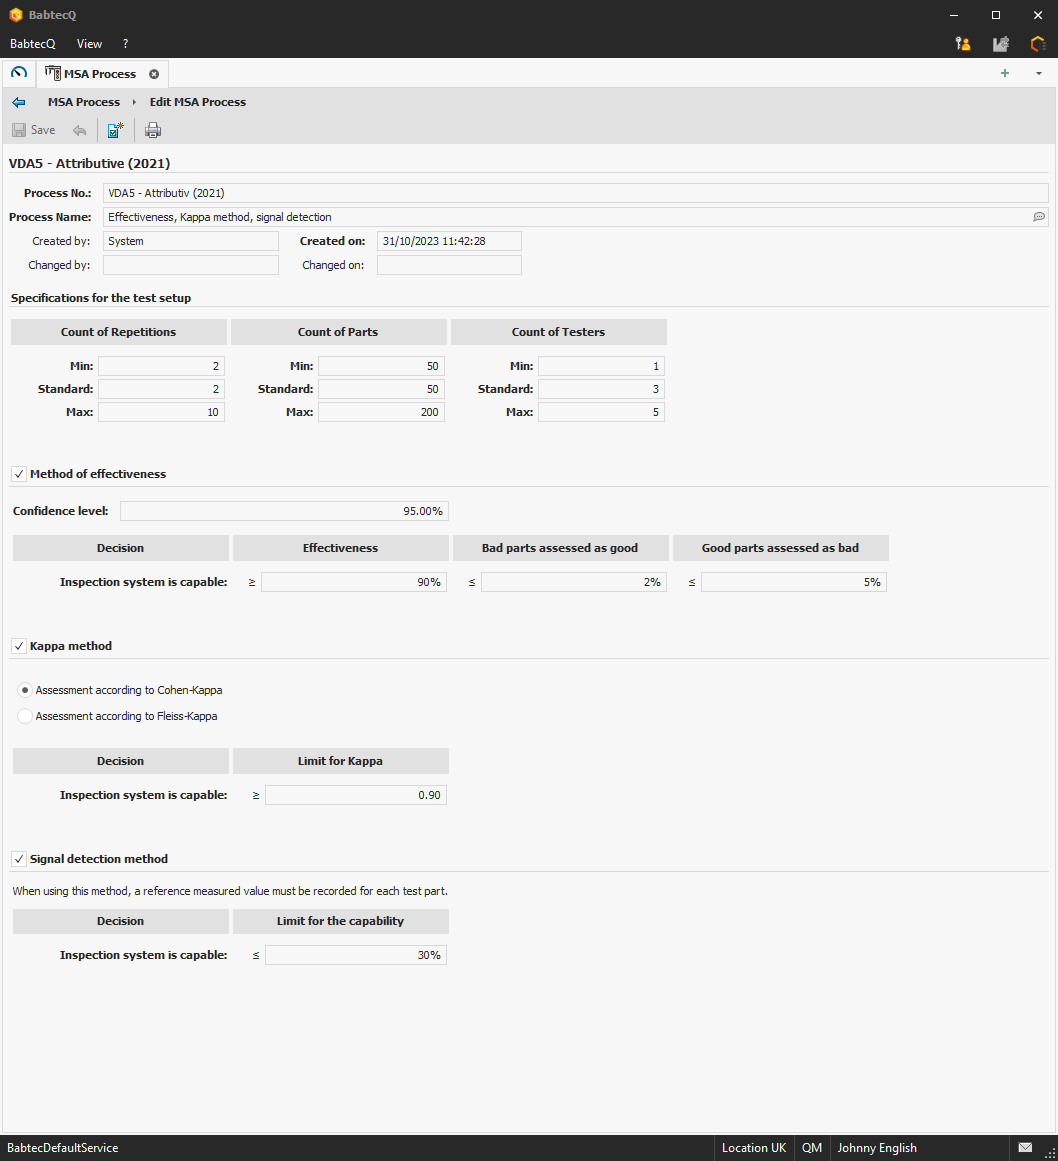
Version 7.9 offers you a new attributive process for your MSAs that meets the requirements of the current VDA guideline (2021) - with kappa method (Cohen, Fleiss), signal detection and effectiveness assessment.
A new wizard guides you step by step through the creation of a new MSA, including information on the characteristic, the gage or the required process parameters. And of course, in addition to carrying out the process, a suitable analysis and a report are also included in the scope of delivery.
By the way, now when using the new attributive process (compared to the "old" attributive process):
Further information on the report can be found in the following section Attributive procedure according to VDA Volume 5: Report.
All further detailed information about the new process and the methods used can be found in the online help.
When creating the new "Attributive suitability test" report, you can decide in the report configurator which of the analyses performed should be included in the report. If "Kappa" was analyzed, you can also decide whether intermediate results should be included or not - this applies to the cross table for "Cohen-Kappa" or the determination scheme for "Fleiss-Kappa". The report is then generated according to your selection in the report configurator.
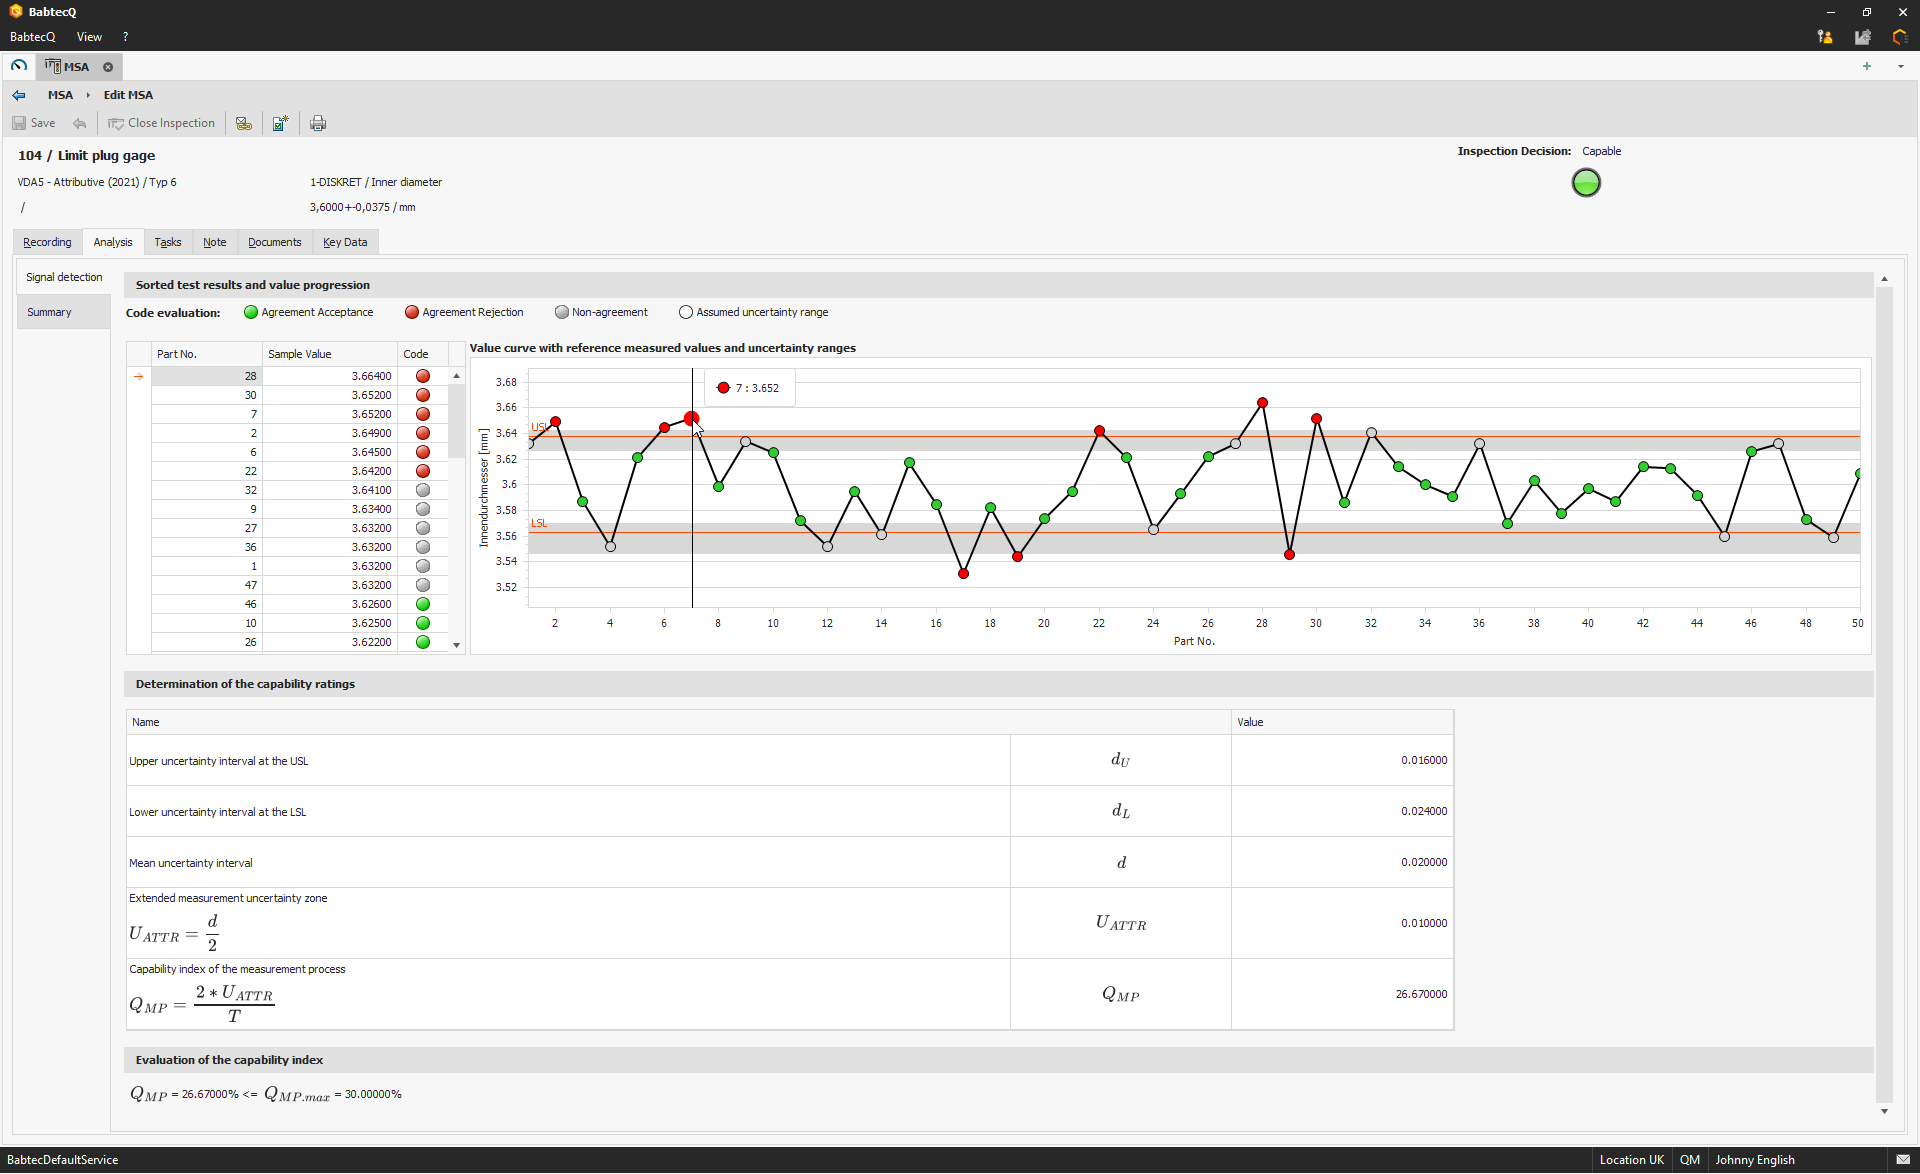
With the provision of the new MSA process "VDA5 - Attributive", the signal detection method has been updated. The calculation now corresponds to Bosch process no. 6.
Please note:
The process variation %GRR is shown as "QMP" in the new process. If the process designation "Bosch process 6" is to be printed in the report, copy the system process "VDA5 - Attributive" in the "MSA process" catalog and assign a new MSA process number (→ "Bosch process 6").
The kappa method has been updated with the provision of the new MSA process "VDA5 - Attributive". Two options are now available for determining kappa: kappa according to Cohen or kappa according to Fleiss.
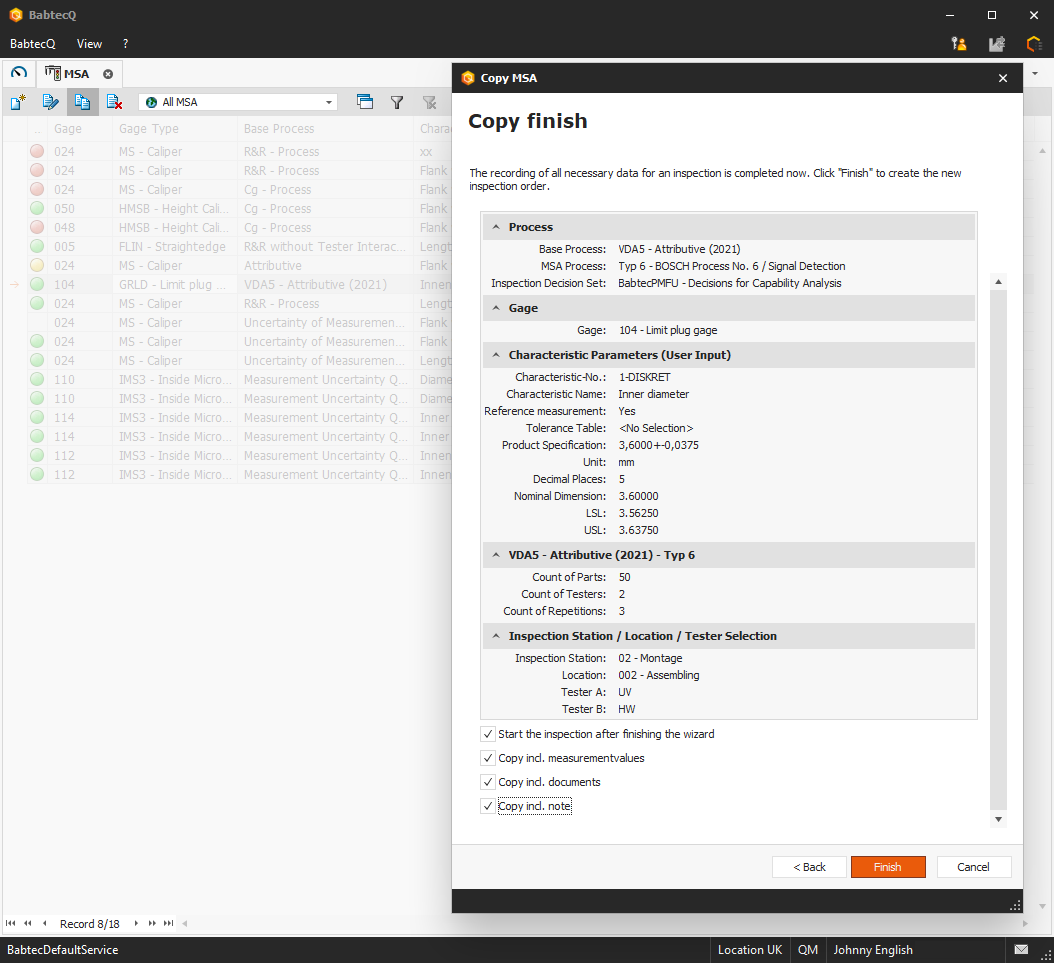
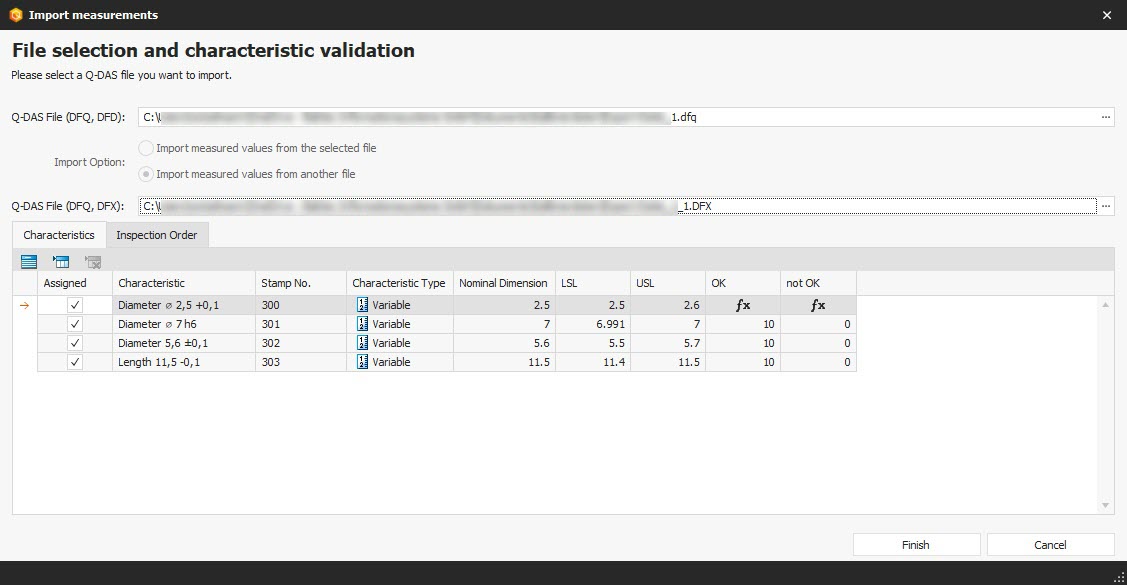
In version 7.9, it is now possible to use a copy based on an existing MSA to create a new MSA - regardless of whether the MSA has already been completed or is still being processed. You can edit the key data in the copied MSA. In addition, you now also have the option of reusing previously recorded measured values from any existing Babtec MSA, CSV or Q-DAS file in the "Measurements" tab of a MSA.
Please note that measured values can only be copied to the new MSA if you have not previously changed the basic or MSA process or the test setup for the new MSA in the wizard – otherwise the "Copy incl. measured values" option is deactivated.
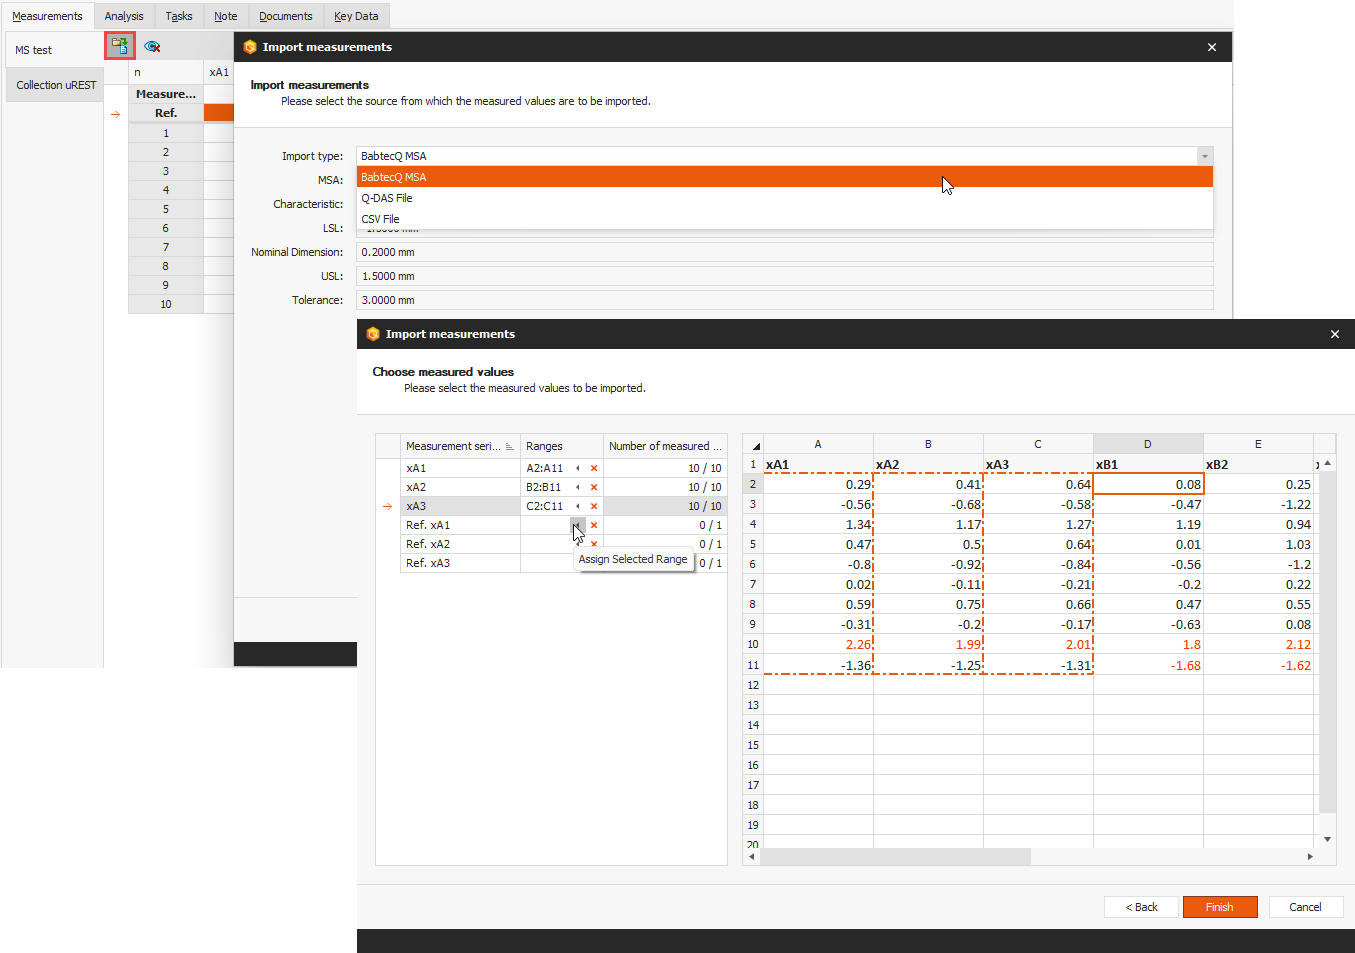
In every MSA in which a variable process is used, you can now also access previously recorded measured values from other sources. For this purpose, the new "Import measured values" function is available on the "Measurements" tab when editing a MSA, which you can use to import and reuse measured values from another Babtec MSA, from a CSV or from a Q-DAS file.
For example, recorded measured values from an MSA investigation that has already been carried out can be reused in a VDA MSA.
Please note that the new "Import measured values" function is available in all MSAs that use one of the following basic procedures and have not yet been completed:
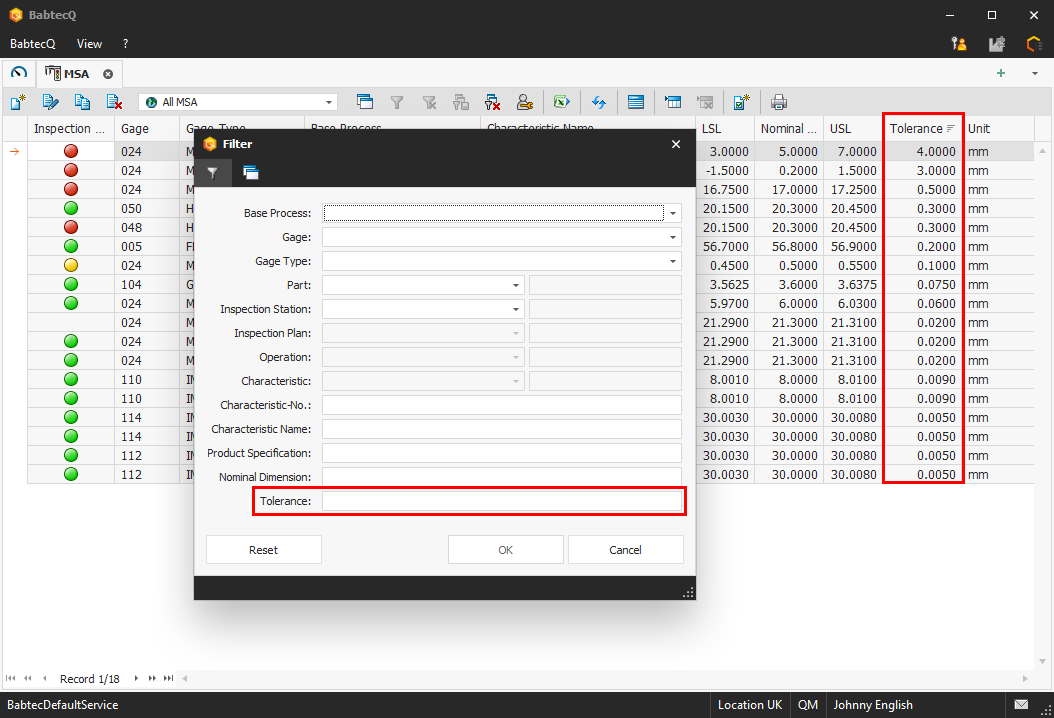
In the "MSA" module, the "Tolerance" column has been added to the list view – you can now also use the tolerance specification of the characteristic when searching for a specific MSA using the detail filter.
The "Tolerance" field has also been added to the filter dialog for creating views.
An important objective in the further development of our software modules is to ensure high-performance use. If family inspection plans have a large number of linked inspection plans, there may have been longer waiting times in the past when a new version of the family inspection plan was released. In version 7.9, a significant improvement in performance has been achieved in this context.
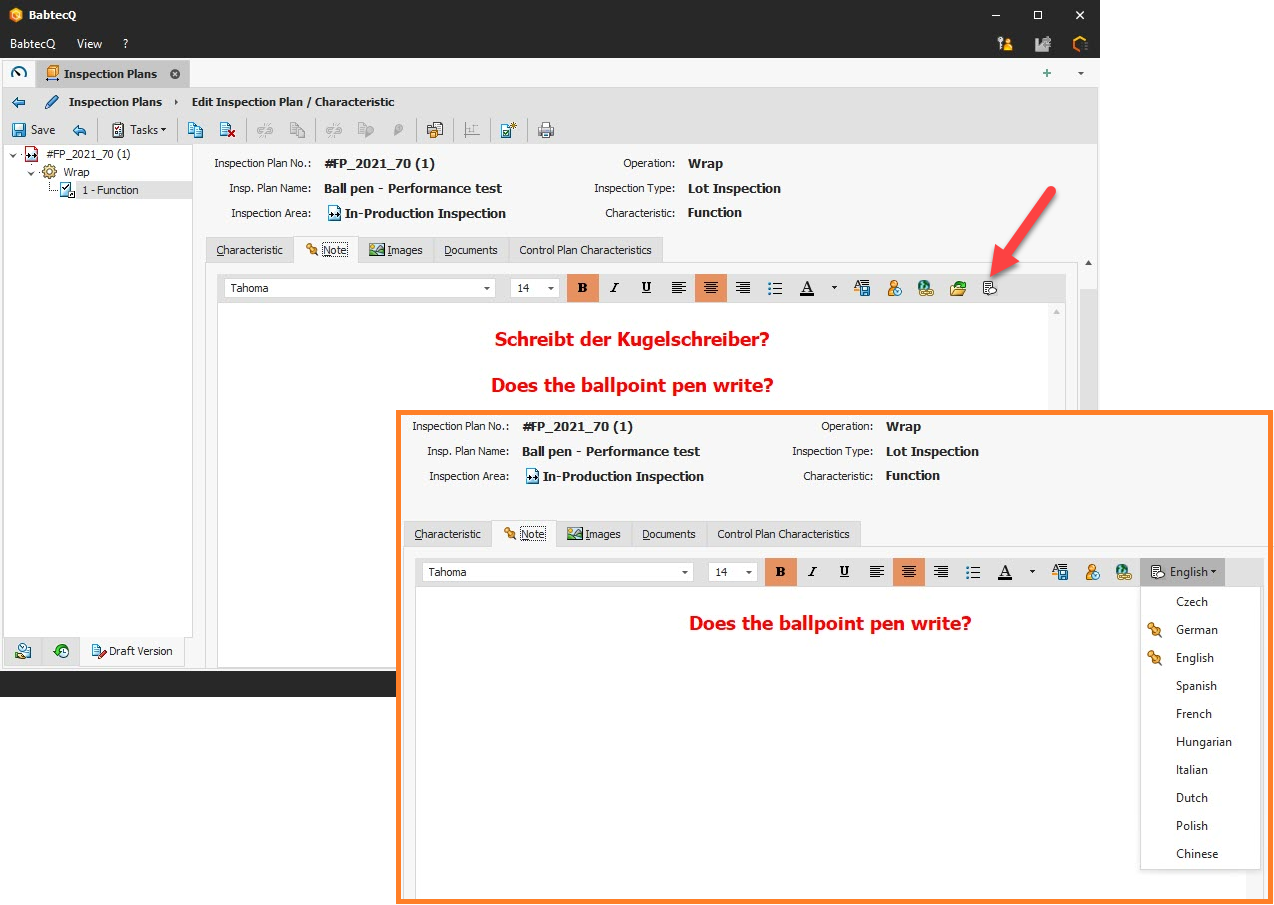
If your BabtecQ system is configured as multilingual, you can maintain the content of the multilingual fields in the activated languages. Note fields, however, are not yet multilingual.
However, because inspection plans and the inspection instructions derived from them for carrying out the planned quality inspections in the "Inspection" module are very oftenused at foreign production sites, all relevant information should be provided to the testers there in the language in which they are registered. For this reason, all note fields in the inspection plan are now also multilingual.
What does this mean for your existing inspection plans?
The inspection plans are unchanged after the update to version 7.9 – the notes at inspection plan, operation and characteristic level are still only contained in "one language", so that the same content is displayed in each language as before. However, if it is now necessary to maintain the notes inmore than one language for certain inspection plans, you can decide in a new working version of the inspection plan for each individual note whether it should be converted into a multilingual note.
To do this, you will find the new "Create multilingual note" function in the toolbar of a note. The existing content is converted according to the supported formatting options and initially only saved in the language in which you are logged in.
Please note that the content may differ after the conversion due to the formatting options available in multilingual notes. Therefore, please inspect the new content – the conversion of the original note content and the creation of the multilingual note is only complete when the inspection plan, operation or characteristic is saved. Until then, the conversion can be undone.
After converting the note field, you can edit the note with various formatting options (colors, fonts, etc.) and maintain it in the required additional languages. It is not possible to add images to a multilingual note. As soon as content is available in a language, this language is marked with an icon in the selection list.
If the inspection plan or order is now used in the "Inspection planning", "Inspection" or "Orders" modules, the content of the multilingual notes is now displayed in the respective language of the logged-in user (as for any other multilingual field).
Characteristics can be imported into an inspection plan from various sources, including from another inspection plan, from a part approval process or from a drawing. If the characteristics are imported into an inspection plan operation with lot inspection or FRC inspection type, the default setting for the sampling scheme has now been standardized at characteristic level:
When recording measured values via a Q-DAS interface, the file contents are validated against the specification of the inspection plan characteristics after manual selection of the Q-DAS file.
Characteristics whose measurement result is only obtained via a formula calculation are not validated against the LSL and USL values defined in the inspection plan. In this case, a formula symbol is displayed in the "NOK" and "n.o.k." columns in the dialog.
As we informed you in the product information for the last version, the "Quality Cockpit" and "Quality Cockpit Dashboards" modules are no longer available from version 7.9.
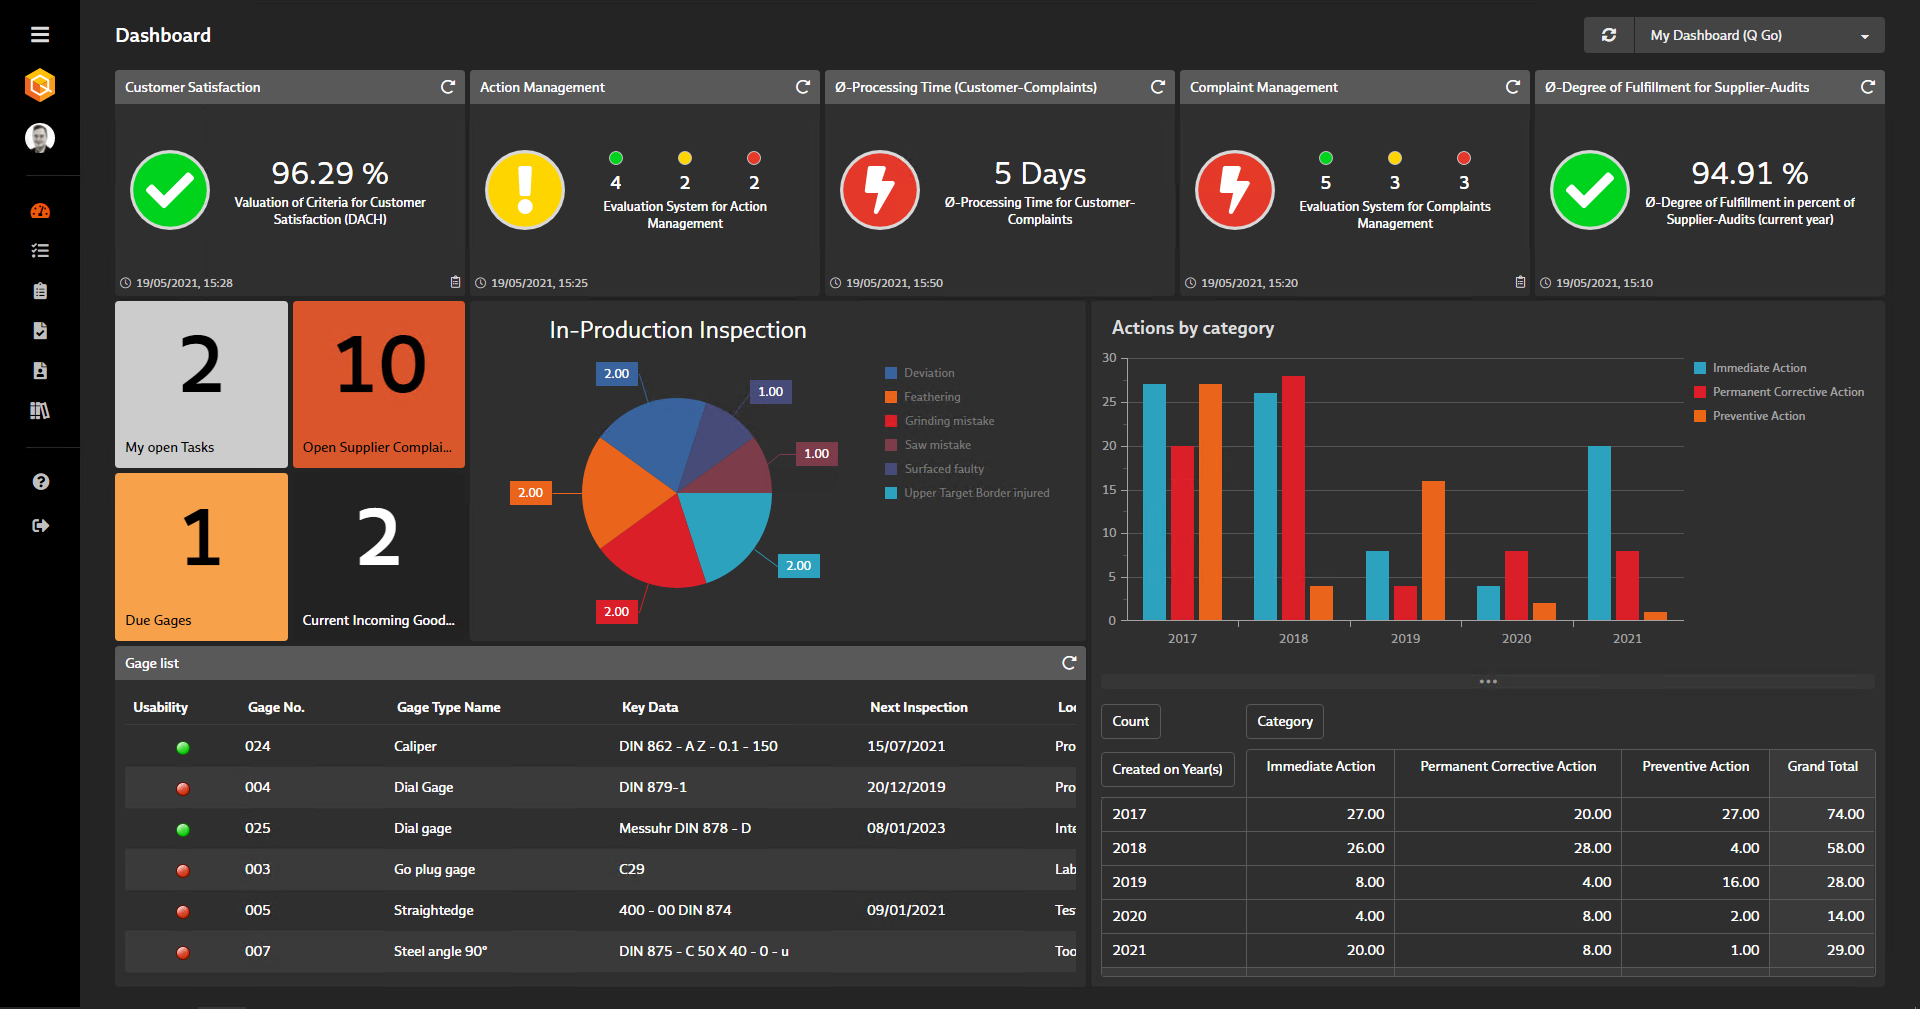
Your existing key figures are of course not affected by this and can still be made available to users in BabtecQ dashboards – and also company-wide in the browser-based BabtecQ Go frontend.
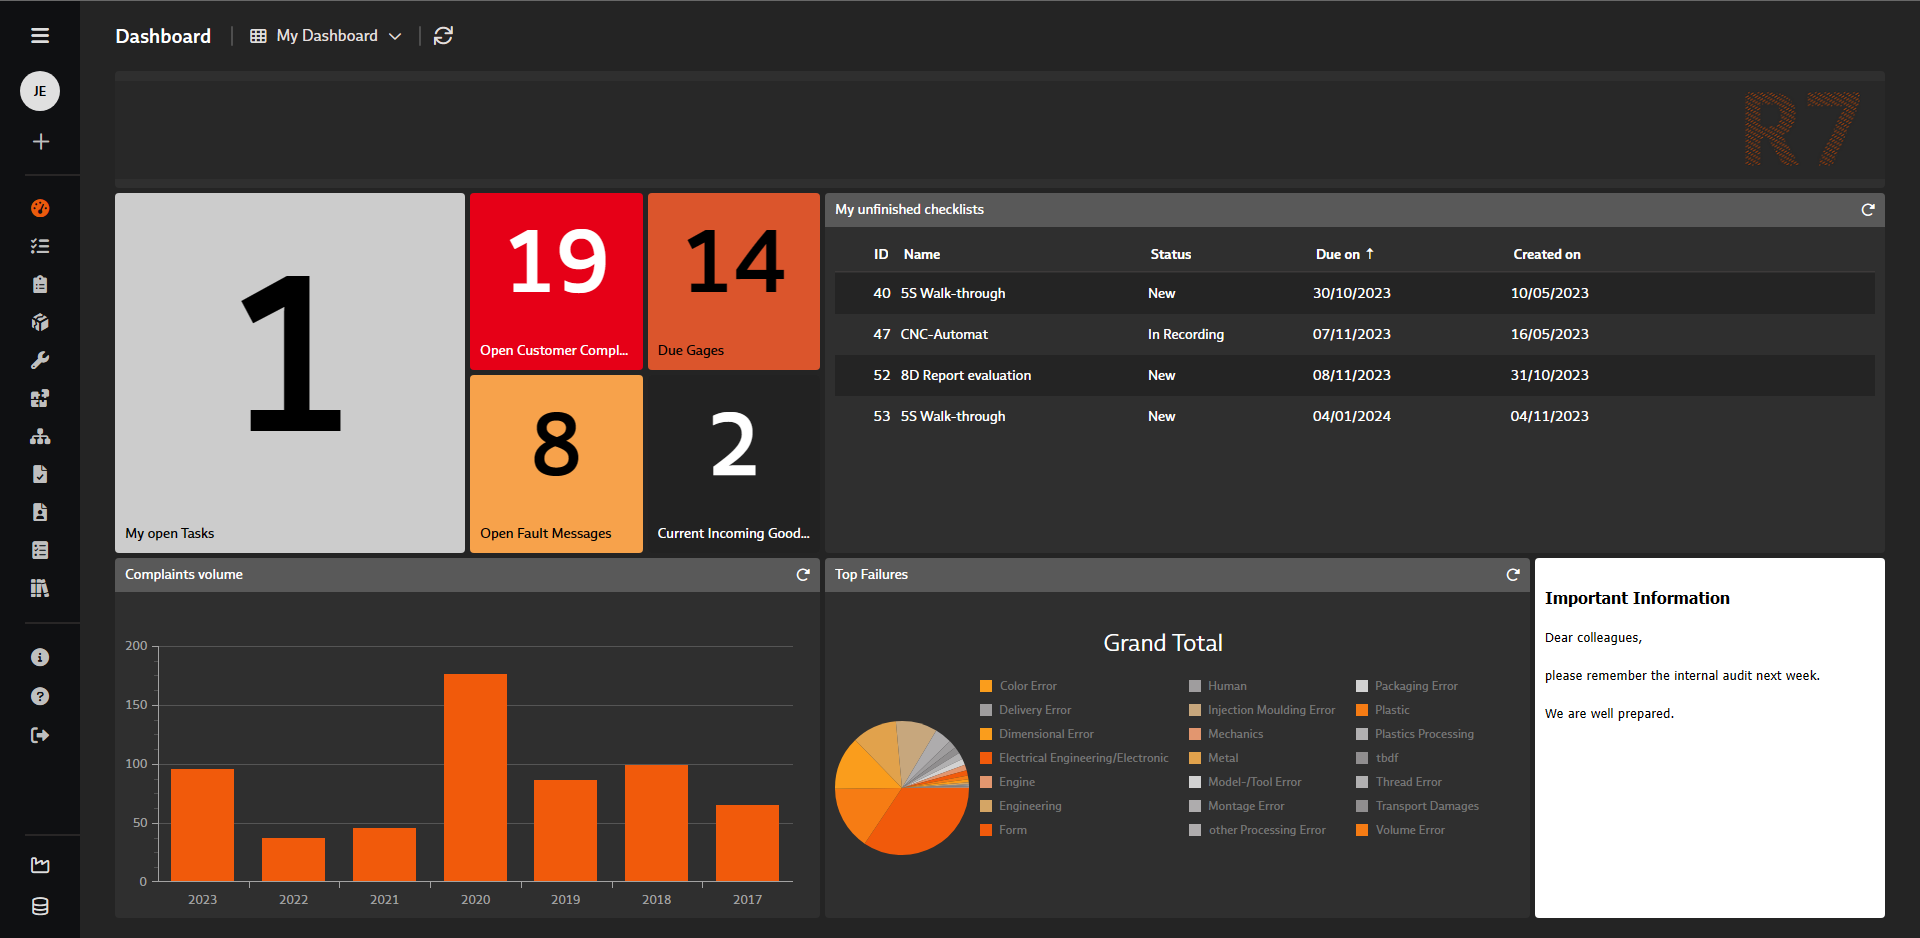
Just in case you are not yet using BabtecQ Dashboards: It's all about providing important and up-to-date information about the quality of your products and processes in a compact and clear way. Create dashboards for different user groups or as a basis for your personal work. Decide which figures, data, facts and information are important for employees and management – you can individually compile the required "tiles" as well as their content, position and size in the Dashboard Designer.
Since release 7.2, you have also been able to use the "Quality Cockpit key figure" tile, which now has a much wider range of functions than the "old" Quality Cockpit dashboards. In the new tiles, you can record the key figure history and create actions for the key figure. We will therefore continue to plan further development of the Quality Cockpit key figures for the new dashboard only.
Please note:
If you have not yet created all Quality Cockpit dashboards as new dashboards, please inspect them before updating to Release 7.9 to see whether there is still any need for action. If you have any questions, please get in touch with your contact at Babtec.
When dealing with deviations and complaints, it is almost always necessary and useful to exchange new information, findings and data directly with your business partners - i.e. with suppliers and customers. The aim is to find and initiate effective actions to eliminate the causes of problems and failures in the future. You proceed systematically and use the proven and required 8D method.
If you also rely on BabtecQube, for example, to share failures detected in purchased products from the recorded BabtecQ supplier complaint with your suppliers and work together to resolve the problem, then the new release offers interesting new features for you.
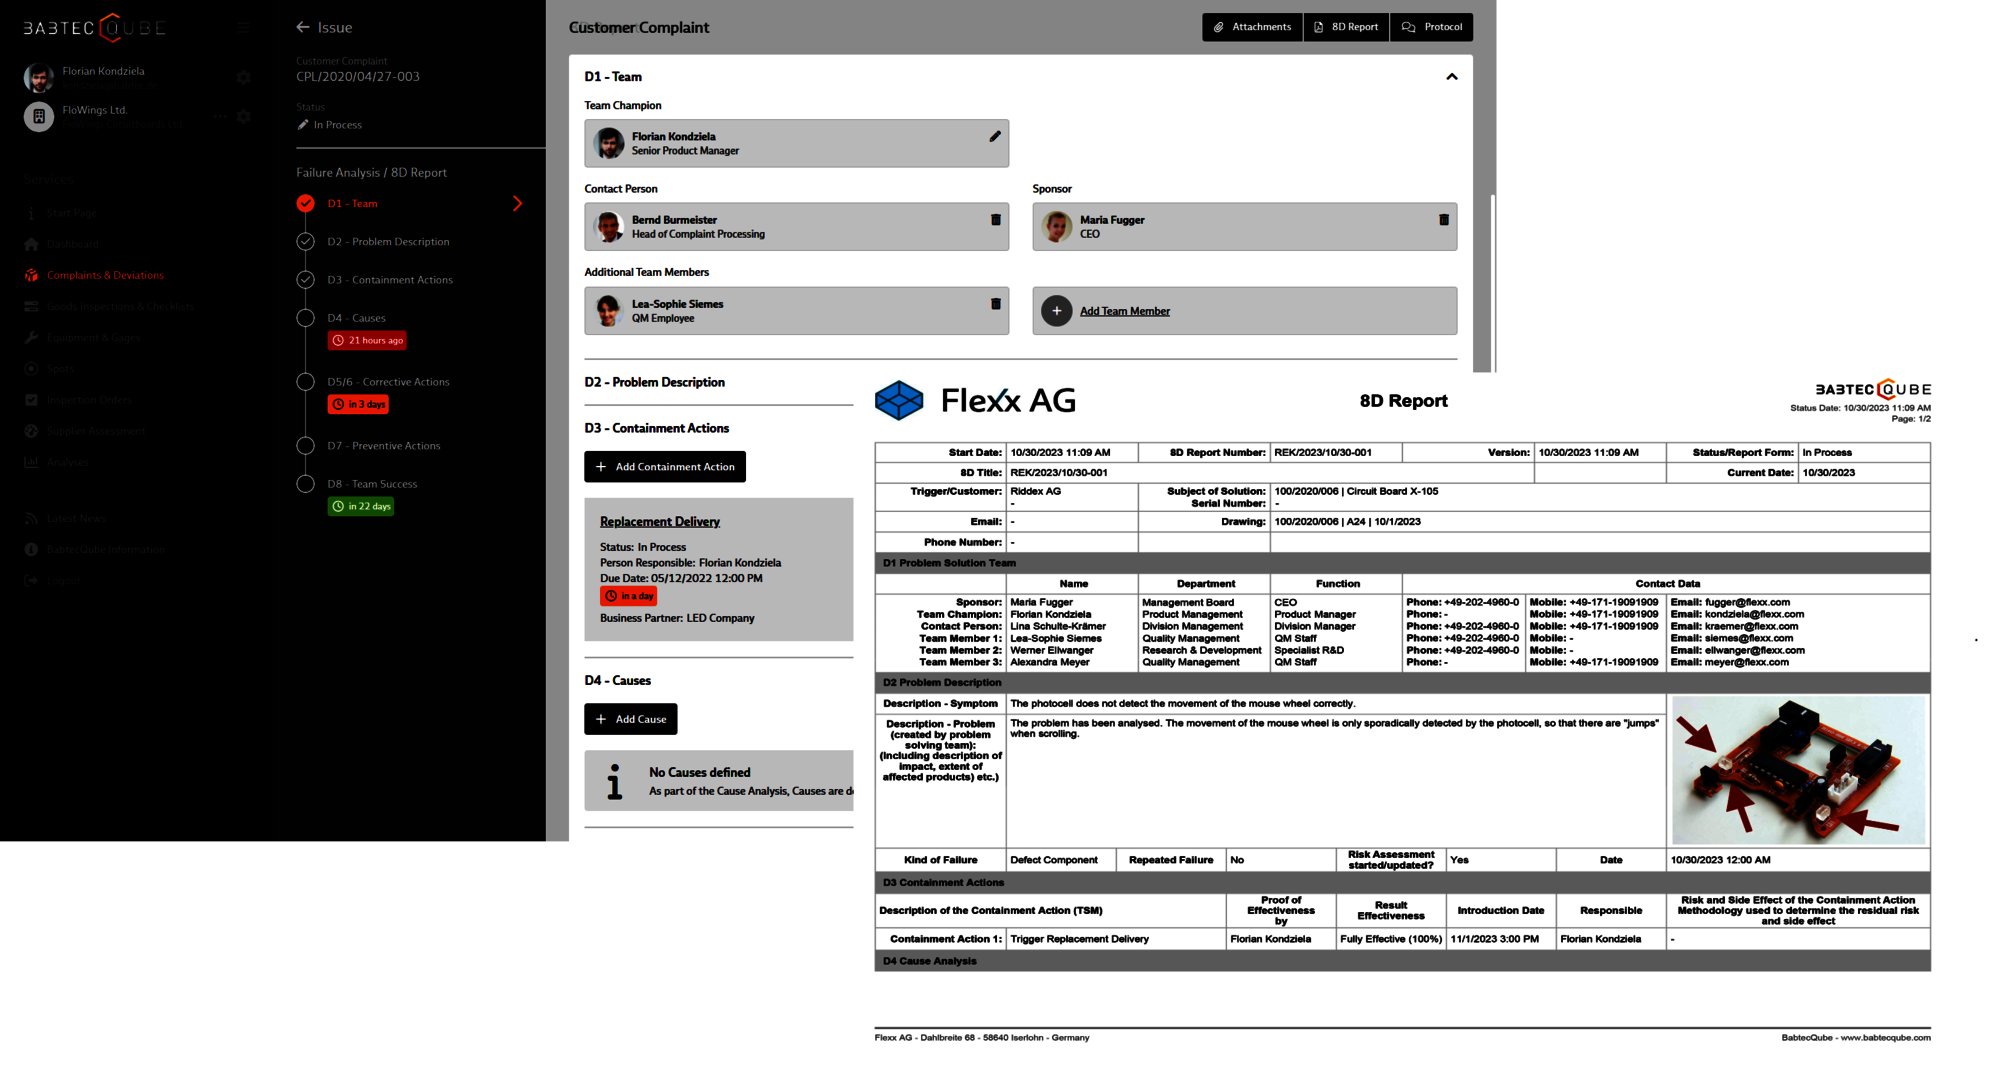
With version 7.9, the exchange of complaint data (sharing failures and receiving the 8D report) via BabtecQube is now based on the 8D report currently required in the VDA guideline (2018).
In this context, the deadlines or dates defined for the individual 8D steps are now also synchronized with the BabtecQube.
Nevertheless, BabtecQube ensures that complaints from older BabtecQ versions can still be shared and received with business partners. Depending on the BabtecQ version from which a complaint was shared, the processing masks in BabtecQube automatically adapt for the user.
Backwards compatibility is also ensured for the exchange of complaints between two BabtecQ systems via BabtecQube.
Version 7.9 offers further useful general changes and enhancements for the exchange of complaint data:
The following functional changes have been made in version 7.9 specifically for sharing a complaint with a supplier:
Here is an overview of the changes that affect data exchange:
Here you will find an overview of the changes that affect the data exchange when importing an 8D report from BabtecQube into your BabtecQ system:
Here you will find an overview of the changes that affect the data exchange when importing a customer complaint from BabtecQube into your BabtecQ system:
The following functional changes have been made in version 7.9 specifically for sharing an 8D report with the customer:
Here is an overview of the changes that affect data exchange:
Two address fields are available in the process data of a complaint ("ADR1" and "ADR2"), the use of which is defined in the selected complaint type. If the complaint is to be shared with the supplier, an address (supplier) must be specified that has a valid company account in BabtecQube.
If the Babtec.connector/REK is licensed in your BabtecQ system, an extended selection list of addresses is available from version 7.9. The additional columns "BabtecQube business partner" and "Company account ID (BabtecQube ID)" show you immediately whether you can currently exchange complaint data with the supplier via BabtecQube. In addition, these two fields have been provided as criteria in the filter dialog of the selection list.
Please note: The extended selection list for addresses is also used in the following other modules, provided that the corresponding Babtec.connectors are licensed:
For the "Complaints" module, version 7.9 introduces the new right "Share own complaints and 8D reports with business partners".
This right can now be used to determine who can use the BabtecQube
When processing complaints, there are a number of work steps in which those responsible must be determined and documented or in which it is recorded who has recorded certain data or made decisions.
For reasons of consistency, "User contact" is now used instead of "User short name" in the following cases:
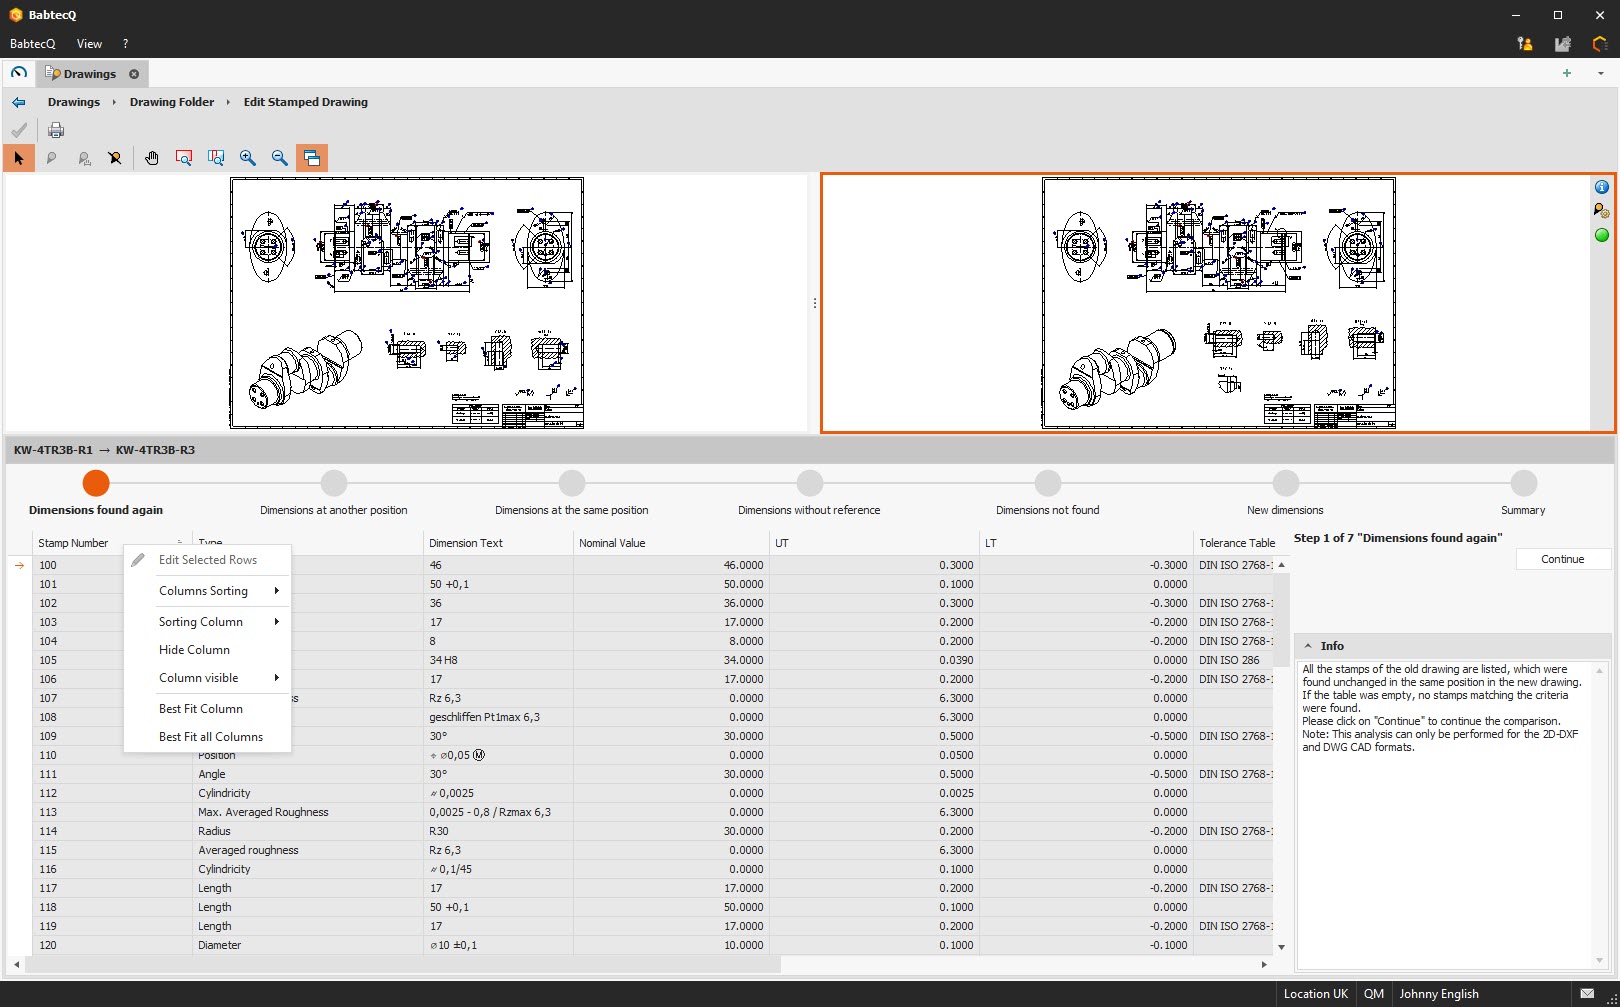
Various list views are available for the individual processing steps when comparing drawing dimensions. You can now also make the usual personal settings here, such as sorting column contents, showing or hiding, moving columns and individually setting the column widths. The last settings used are also saved here on a user-specific basis so that they can be used again directly the next time the drawing dimensions are compared.
In version 7.9, we have continued to work on optimizing the recognition of drawing dimensions for you – partly taking into account CAD system-specific "peculiarities":
")

